Grimrest
Grimrest was once a large village supported mainly by its work on the tower. It's now a few roads cutting through ruins. You can only tell a village used to be here by the foundations that are poking through the struggling vegetation.
There are a few buildings that still “stand,” either through magical means or because they're made from sturdier materials. The village has an imposing outer wall that is mostly still standing; its crenellations have been worn down by time and weather, but most of the wall continues to keep outsiders out.
There is one faction that calls Grimrest their home, the Big Wall Gang. This group of Ogres are too big to get into the tower without getting stabbed horribly, so they have taken the Old Temple as their home.
The main threat outside the tower is the Tower Dragons, who often patrol the skies looking for an easy meal or a tax to collect.
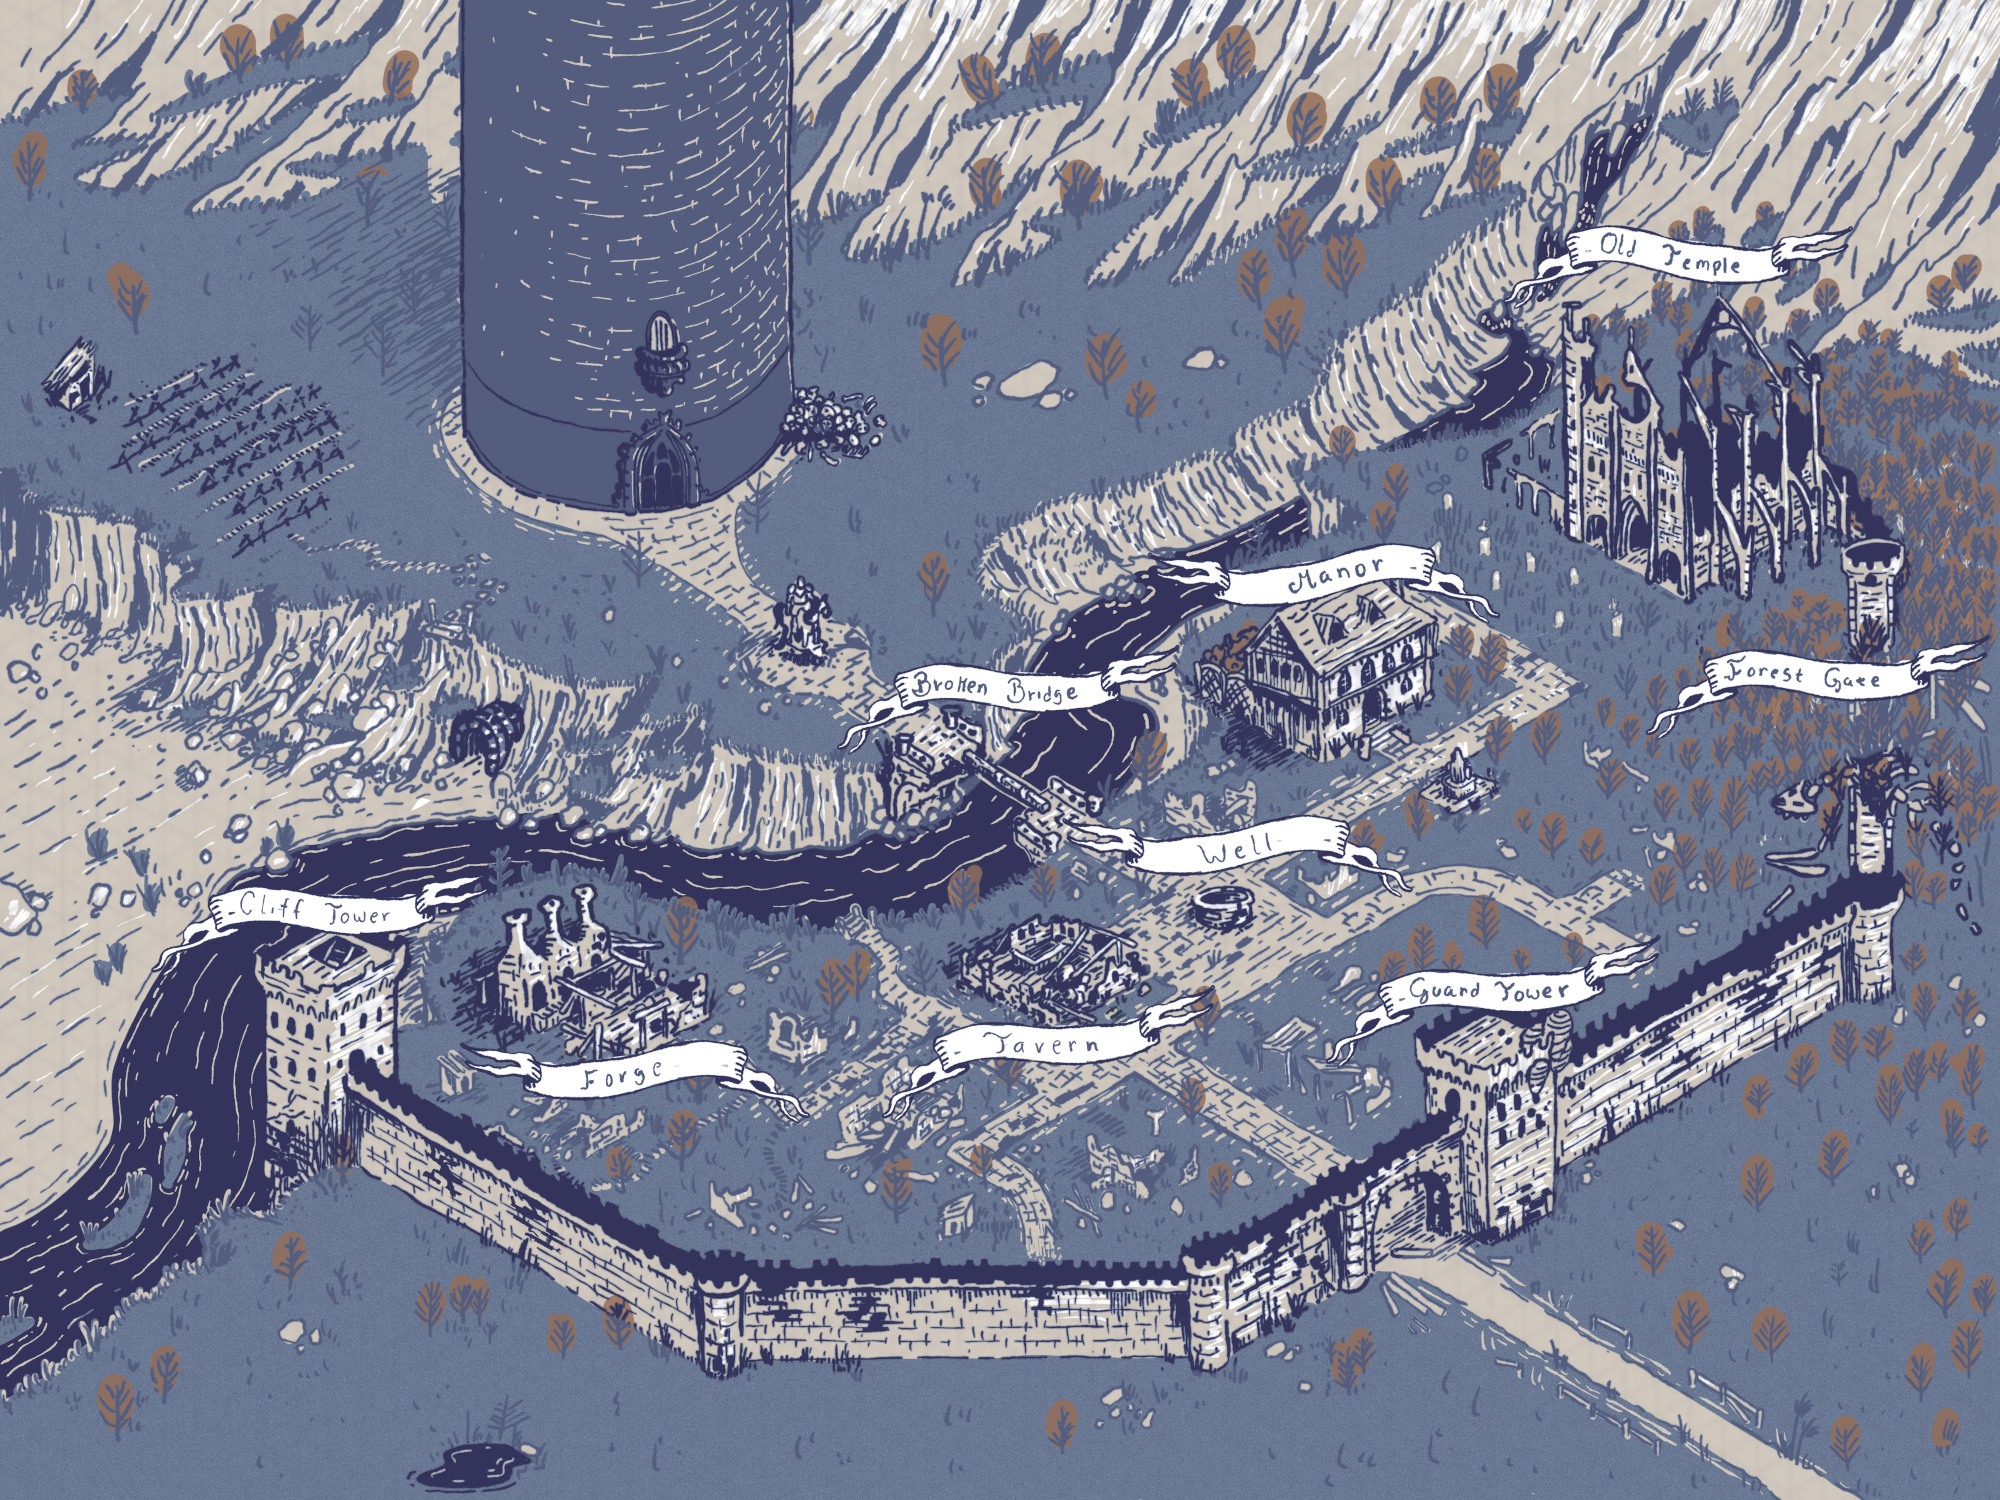
Map
Random Encounters
Roll 2d6
| 2d6 | Encounter |
|---|---|
| 2 | Tower Dragons (1d3 Blue Dragons ) |
| 3 | Blink Dogs (1d6) |
| 4 | Children of the Tower (2d6 members, posing as scavengers or adventurers) |
| 5 | Killer Bees (1d6) |
| 6 | Roll twice; use both results |
| 7 | Big Wall Gang (1d6) |
| 8 | Children of the Tower Ambush (1d6 veterans, 1 wizard or cleric) |
| 9 | Kobolds (4d4; 1d2 union status: 1—Union, 2—Better Union) |
| 10 | Gargoyle (flying patrol 1d6) |
| 11 | The Worm (Kurax) |
| 12 | Trader |
History
Grimrest started as a tiny hamlet in the middle of a somewhat magical forest. They produced enough for themselves and were far from any major city or population centre. This was on purpose; these people wanted to be left alone.
This changed, however, when an impressive wizard, Alistair Mortayne, turned up looking to build his tower and continue his research. He also wanted to be left alone, but could be the village's guardian in return for any trade they could do between them. The village agreed, and before you knew it, the village had grown massively in size with skilled tradespeople looking to capitalise on this rapidly growing tower.
Looking at the village at its peak, it had a huge quarry, a smithy that could support a large town, and a temple for a city, all built behind castle walls. Food had to be shipped in for all the new people; it was great for the tower, but the original residents found themselves in a gold rush town.
Eventually, this tower gained the interest of other influential people who wanted its secrets. This led to thieves in the night, flying wizards who attacked with fire and eventually, mighty armies.
So Alistair invited the villagers to a meeting in his new throne room to discuss their moving into the tower, as it would be much safer there. Nobody left that meeting, and Grimrest was left abandoned ever since.
Grimrest Locations
Gate House
In the middle of the wall is a large gatehouse complete with a small guard tower. The gateway is wide enough to fit two wagons through at once, a very grand entrance for such a small community. The door for this gate has long since gone, with only a few hinges still hanging loose from the walls.
The guard tower is in shockingly good condition and has a layout similar to the Cliff Tower; the only difference, however, is that it now contains a hive of Killer Bees . They can be seen using the arrow slits as doorways to their home. The actual doors are stuck with honey but can be forced open, just hope that the bees are happy to see you.
Tavern Rubble
This building is labelled as a tavern, but most people would not be able to tell what it used to be. The raised foundations still stand, and what's left of a bar can be seen amongst the rubble of its collapsed roof.
To the north-east side of this ruined building is a larger pile of rubble that can be moved aside to reveal an entrance to a basement. These ancient stone stairs lead down to the tavern's cellar, which is mostly empty except for a hand-carved tunnel that leads down deeper under the Well.
Old Forge
One of the only buildings with its walls still standing, the forge is much larger than anything you would expect from a village this size. It has three large chimneys that come from the middle of the building, mostly standing. The roof has collapsed, making the room very difficult to scavenge.
The building contains three anvils, one of which is in excellent condition. A hidden basement contains many well-preserved pieces, such as half-completed weapons, armour, and even ingots of different metals.
Broken Bridge
The old stone bridge crossing the river valley towards the tower is broken; only the north and south sides still cling to the valley edge. Looking at the broken edges, some signs of acid damage are visible, but it is very old.
Someone or something has moved a large support beam from a nearby house and has laid it over the gap, making a very harrowing crossing. This bridge works, but you should have adventurers roll under Dex if they need to do the crossing in a hurry.
Cliff-Tower
This is similar in style to the Gate House but lacks a gate. This was used as a defence for the wall and also a way to look down into the valley. Over time, erosion has widened the valley, and the tower is precariously close to collapse. Each floor has several arrow slits providing coverage to the outside. Despite its location, the tower could still be used defensively.
Basement

Damp, wet stone, thick condensation meet you as you enter. A small crawlspace is visible to the east, surrounded by mining equipment and excavated rubble.
The crawl space is narrow, so the average person would need to crawl without a backpack on to get through. After 20ft, there is a narrow hole in the floor that drops down 20ft into the Worms Nest (WN-2). Rope left attached to the cliff wall via a piton, very damp but usable.
Loot:
- Pickaxe x2
- Shovel x1
- 30ft of rope
Level 1

The metal door to the outside is stiff and loud but not locked. The room is void of any decoration or furnishings; everything has long since been taken or rotted away.
Stone stairs lead down to the basement level. There are no internal stairs to the 2nd level; access to higher floors would be via the external stairs on the village side of the wall. Unfortunately, they have been destroyed or just rotted over time.
Level 2

This floor is disconnected from the other floors. External wooden stairs have been destroyed, and the ladder to the 3rd floor is missing.
The room contains a small camp long since abandoned. This used to belong to some adventurers who were scavenging Grimrest. They have left bedrolls and cooking equipment, and a fire has even been made but abandoned before being lit.
Loot:
- Leather Armour +1
- Sheild +2
- 100gp
- Wand of the Gatehouse
Adventurers' Journal
In a bag at the camp is a slightly weathered journal documenting the group's time in the village. Key points of interest include:
- They found an injured dragon living under the cliff tower. Found loads of really nice things in its horde.
- They are watching its habits over a few days so they can raid without a fight. Seems to sleep most of the day and then feed on the dead in the valley at night, very skittish about the other dragons, but also very aggressive.
- The last message reads that they are going back in tonight, when it leaves, to feed on the dead outside.
Level 3

This floor is connected to the wall via a secure metal door, slightly rusted but working. There is a ladder and also a very weathered lift to the roof. The lift will work if used, but the wooden floor can't take much weight. Access to floor 2 is missing a ladder.
Lift was initially used to lift an arcane siege weapon onto the tower's roof during an attack; the weapon is long gone. Some strange racks line the walls for its ammo the only real hint of what this lift was used for.
Roof

Weathered stone and crumpled crenellations are all that's available up on the roof. There is a ladder down and a significantly damaged lift that's currently on the floor below. Some old archer hangovers used to be up here but have long since rotted away.
Village Well
This old village well functions as intended if a rope and bucket are provided. The roof and mechanism have long since collapsed, leaving just the stone well.
At the bottom of the well is a simple dock and 1d4-1 boats. The bucket from the well would fall nicely between the docks, alerting nobody to its existence. There is a simple tunnel from these docks that goes to the Tavern's basement.
To the north of the dock, it looks like there is a cave entrance that was not visible from the cliffs outside. This is an illusory entrance that is only disguised from the outside.
Old Temple
Massive old structure on the edge of the village, half concealed by the forest. This old building has been worn away by time; all that remains are the large carved stone supports that look like a rib cage surrounding an area of overgrown stone tiles.
This central area has been filled with tents and campfires for the Big Wall Gang, who use this structure as their home.
There is an underground crypt beneath the temple that contains the remains of a few mayors and the tomb of Lady Elara Mortayne, all of which were looted long ago.
Forrest Gate
Within the thick, tangled forest that's slowly consuming Grim Rest is a large hole in the outer wall. This hole was caused by an ancient green dragon crashing down and dying here, all that remains are a few bones too big to drag away. This happened about 250 years ago, so many of the bones and the damage to the wall show signs of weathering.
This hole in the wall is now the main entrance for the The Big Wall Gang as they travel to the Old Temple.
This dragon failed to return to the tower before the cataclysm and died of the sickness, a good reminder for the other dragons.
Mayor's Mannor
This building is a grand manor built for the mayor of Grimrest, a title created to make the village seem it had more of a say in its fate. This building is the only one still standing in the village, and in perfect condition at that, not a smashed window or flaking paint.
DANGER! Anything standing in front of the main doors to the home will take fire from a magical stature please read the Lobby for more information.
From the outside, the house is beautiful with stone foundations giving way to large log walls. It has large windows and a stone wall surrounding a large courtyard at the rear. This courtyard wall is overgrown with thorn-covered vines, clearly not controlled by the house's cursed nature.
The family refused to attend the final meeting in the tower and died soon after. Their souls were far enough away from the heart of the tower so they were not absorbed.
This home is very cursed; the mayor's family still haunts this building as Spectres , unable to leave.
- Mayor Henrik Baxter
- Libet Baxter (Mayor's Wife)
- Otis Baxter (Teenage Son)
- Brice Baxter (7 Year old Son)
Defeating any of the family is only temporary; they will be back the next day, and the same goes for any damage to the building. To defeat them completly their bodies must be burnt in the crypt below the home or via another ritual. Once all the family are gone, the house will start taking damage normally again, but won't rot away.
Ground Floor
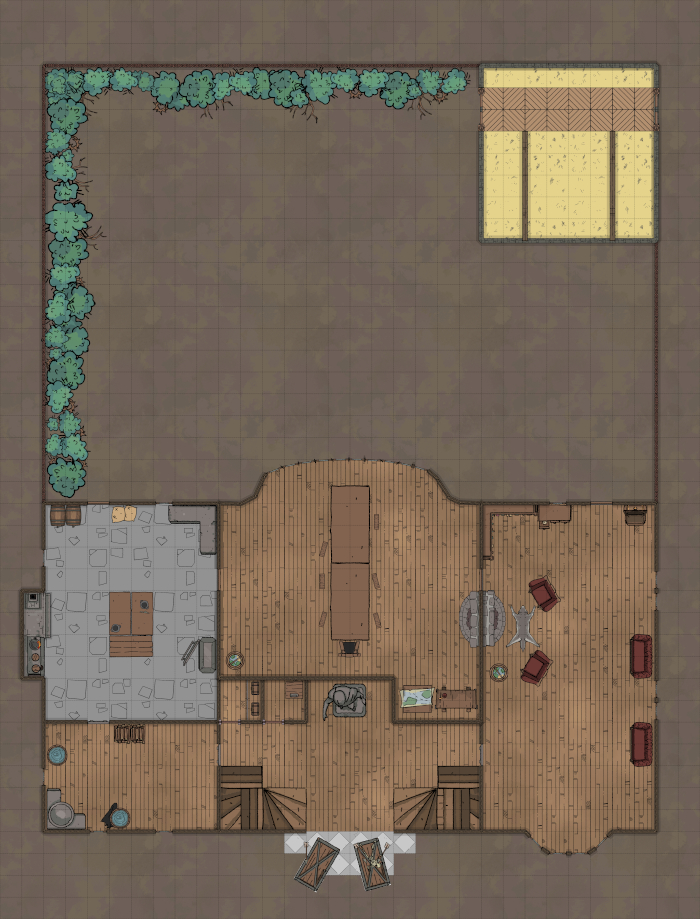
Lobby
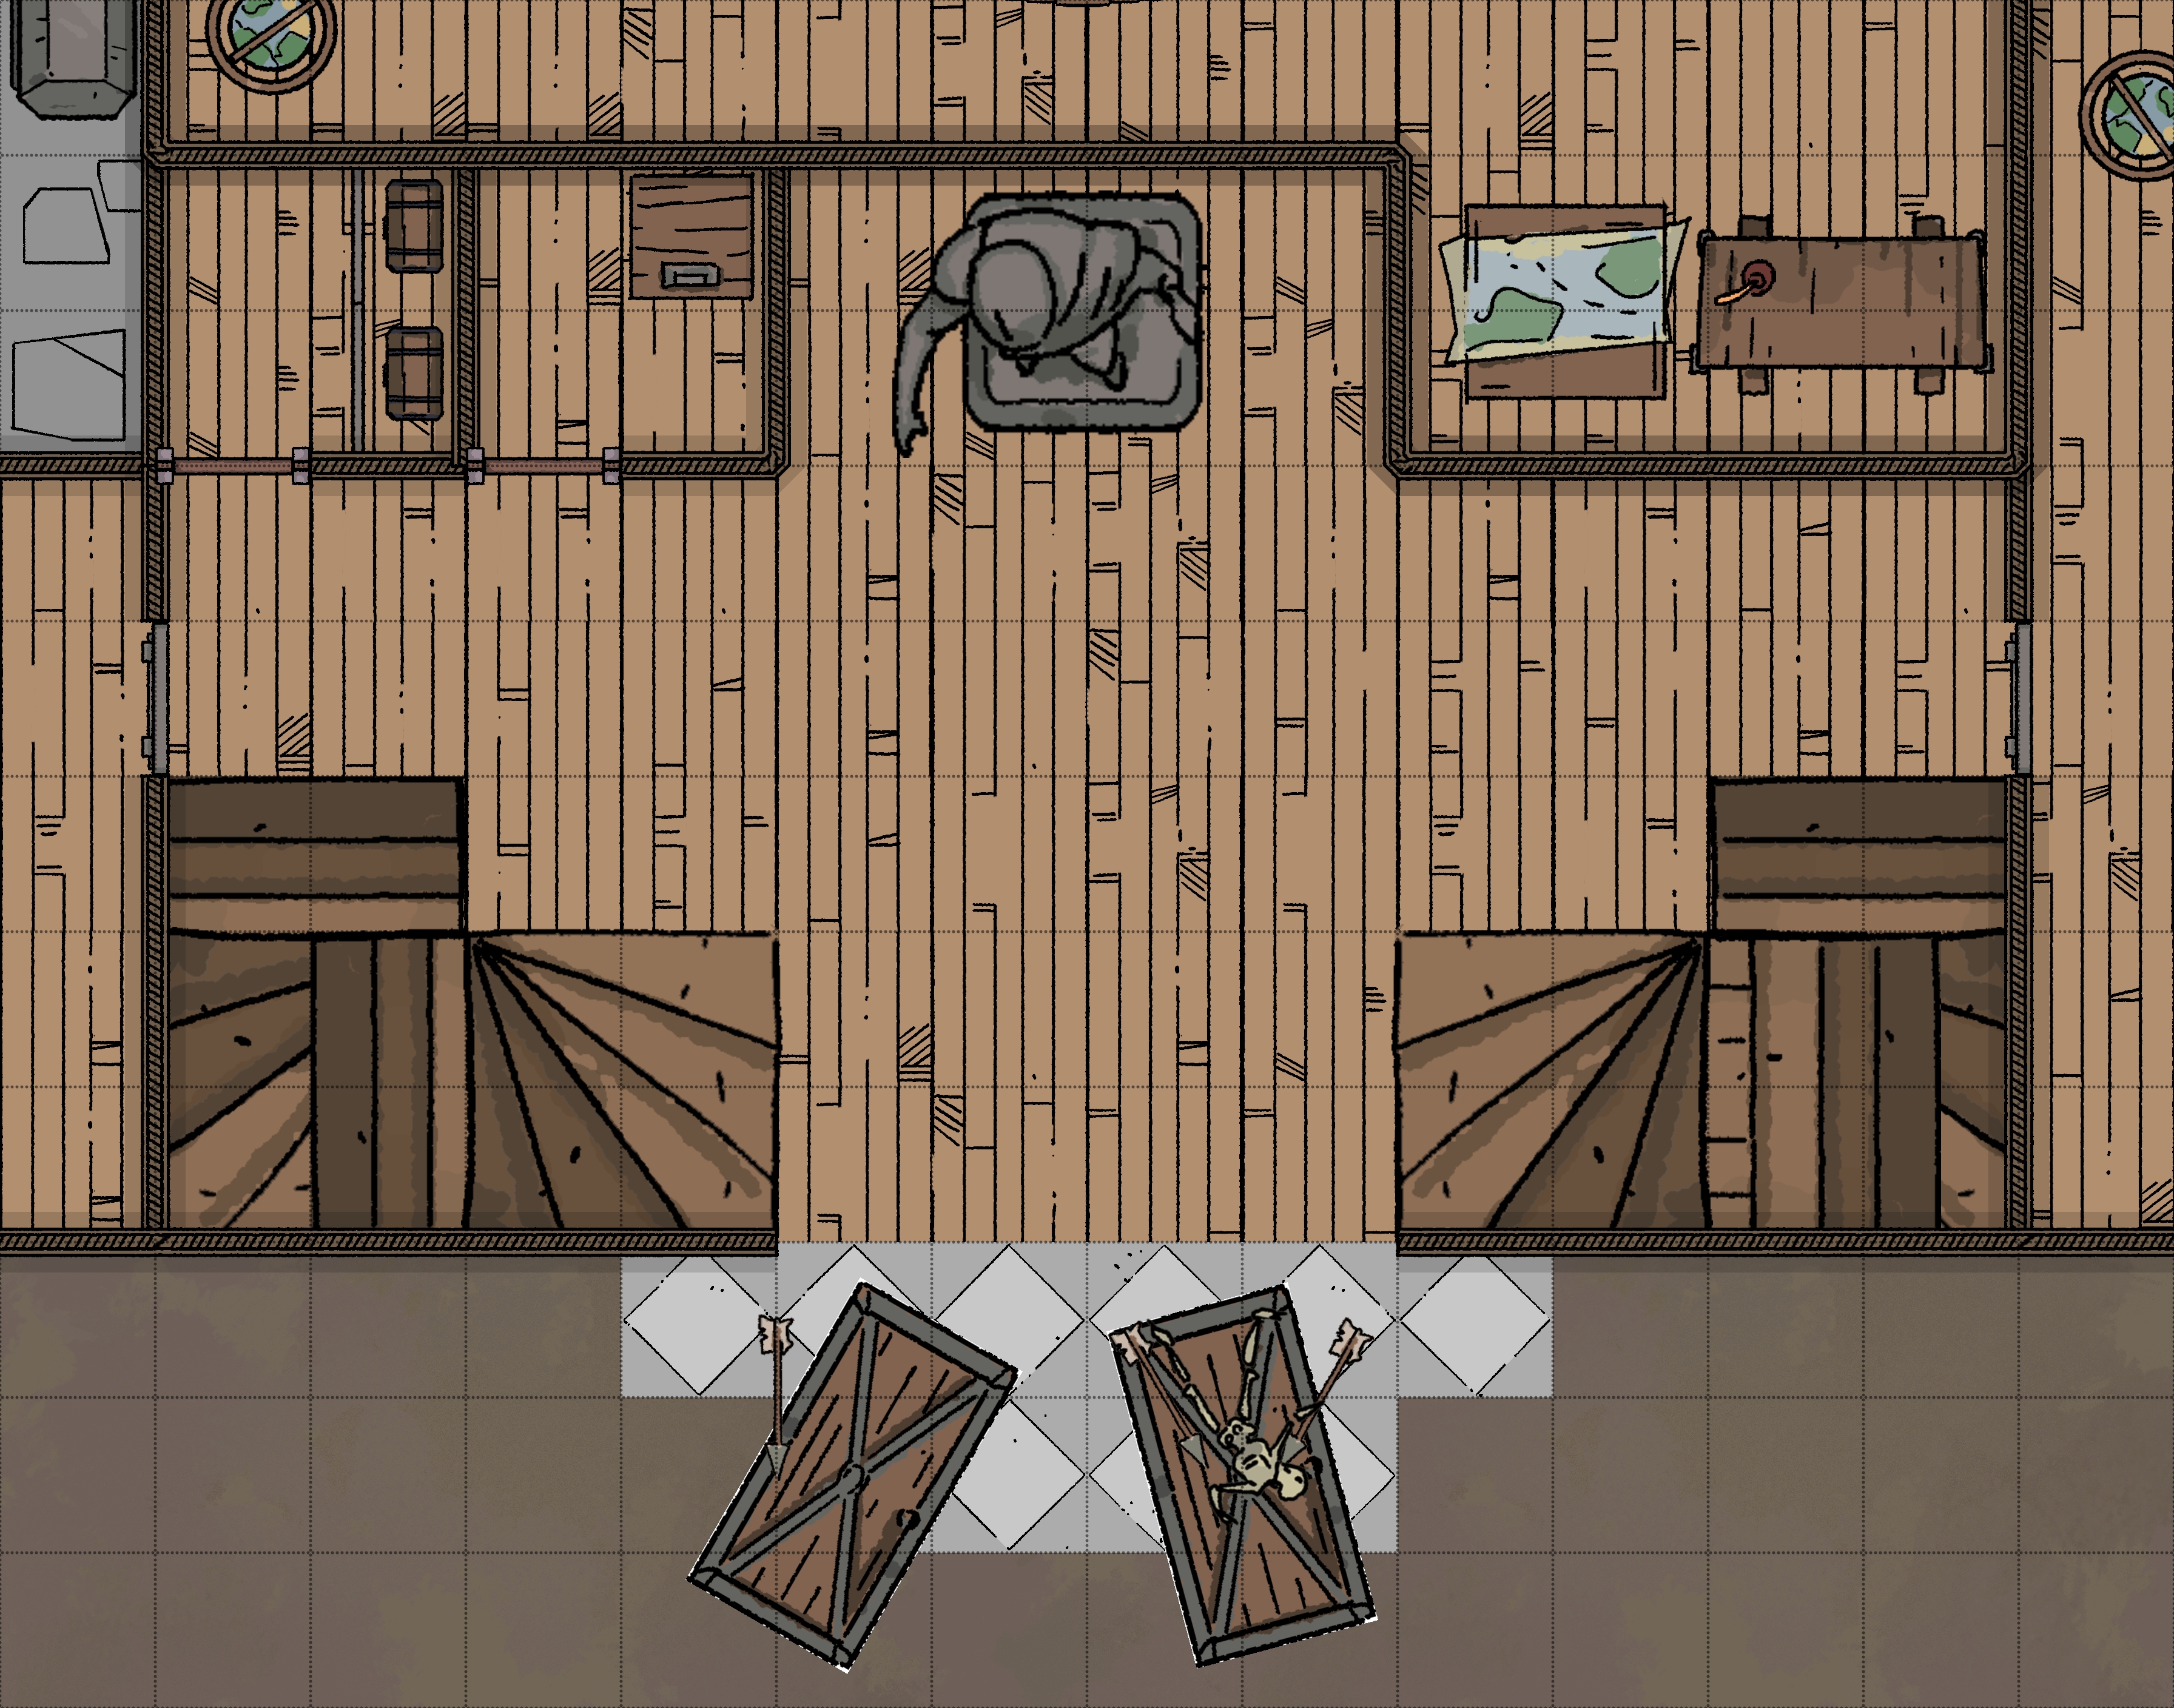
When approaching the home, the first thing that you notice is that the double front doors are off their hinges and in the mud. Large stone arrows stick out of them.
Inside the front doors, you are greeted by a large, grand lobby with twin staircases wrapping around over the top of the doorway. The floors and walls are decorated with rich wood. Opposite the doorway is a large statue of an archer. This is magical and will attack anything that it sees moving within range, which includes things it can see outside the house.
This Stone Archer is fixed in place, unable to move except for shooting its bow. When it attacks, it does not pull an arrow from its quiver instead, a stone arrow forms in its hand magically.
Stone Archer:
Armour Class - [14]
Hit Dice - 50hp
Attacks - 1 x Bow (1d10)
THAC0 - +8
Movement - 0
Saving Throws - D10 W11 P12 B13 S14 (5)
Morale - 12
Alignment - Neutral
XP - 2,300
Treasure - None
Excluding the doors to other rooms, there are two small doors, one leads to a cloakroom, and the other to a ladder down into the basement level.
Inside the cloakroom are:- 2d6 Warm coats (50gp)
- One pocket contains a Ring of Delusion (invisibility)
Utilities Room
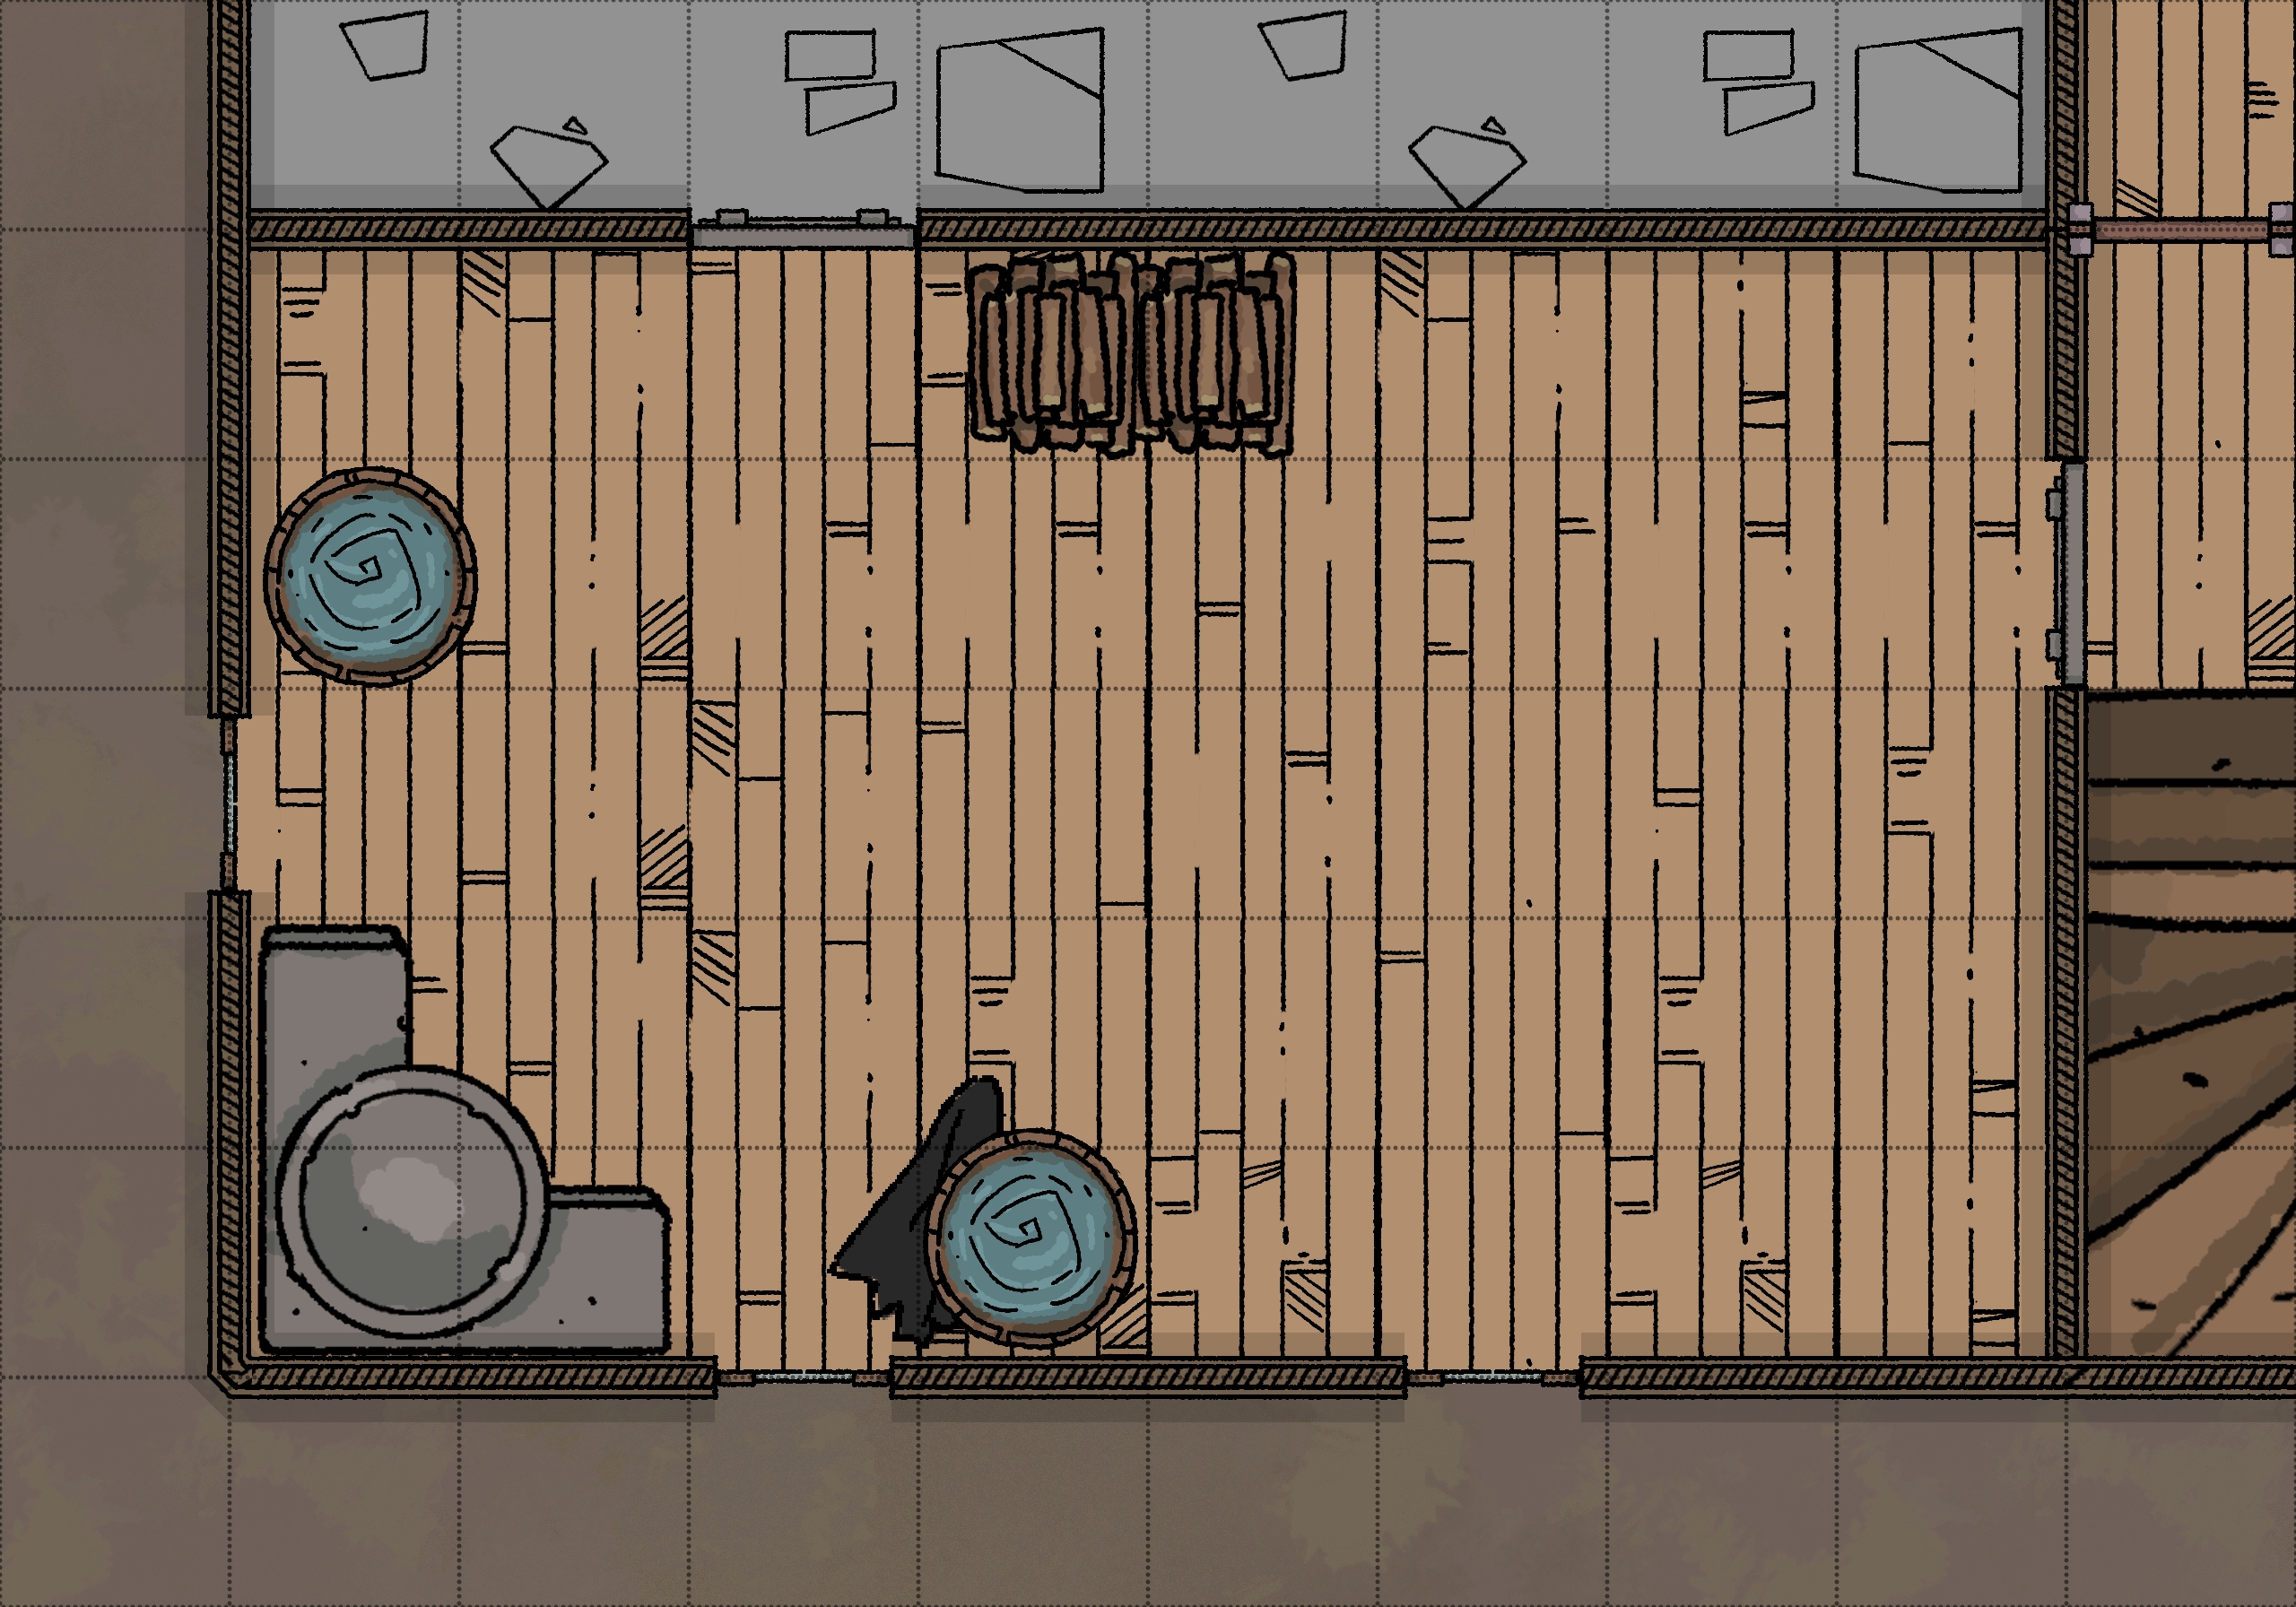
This utilitarian room lacks the grandeur of the rest of the house, being made for the staff. Its floors are smooth stone, and its walls are a simple painted wood. This room is where the staff cleans clothes and stores things for the rest of the home. It's now long since abandoned, with only a handful of useful items left:
- 2 lanterns
- 3 lantern oil
- 5 large sacks
- Crowbar
Kitchen
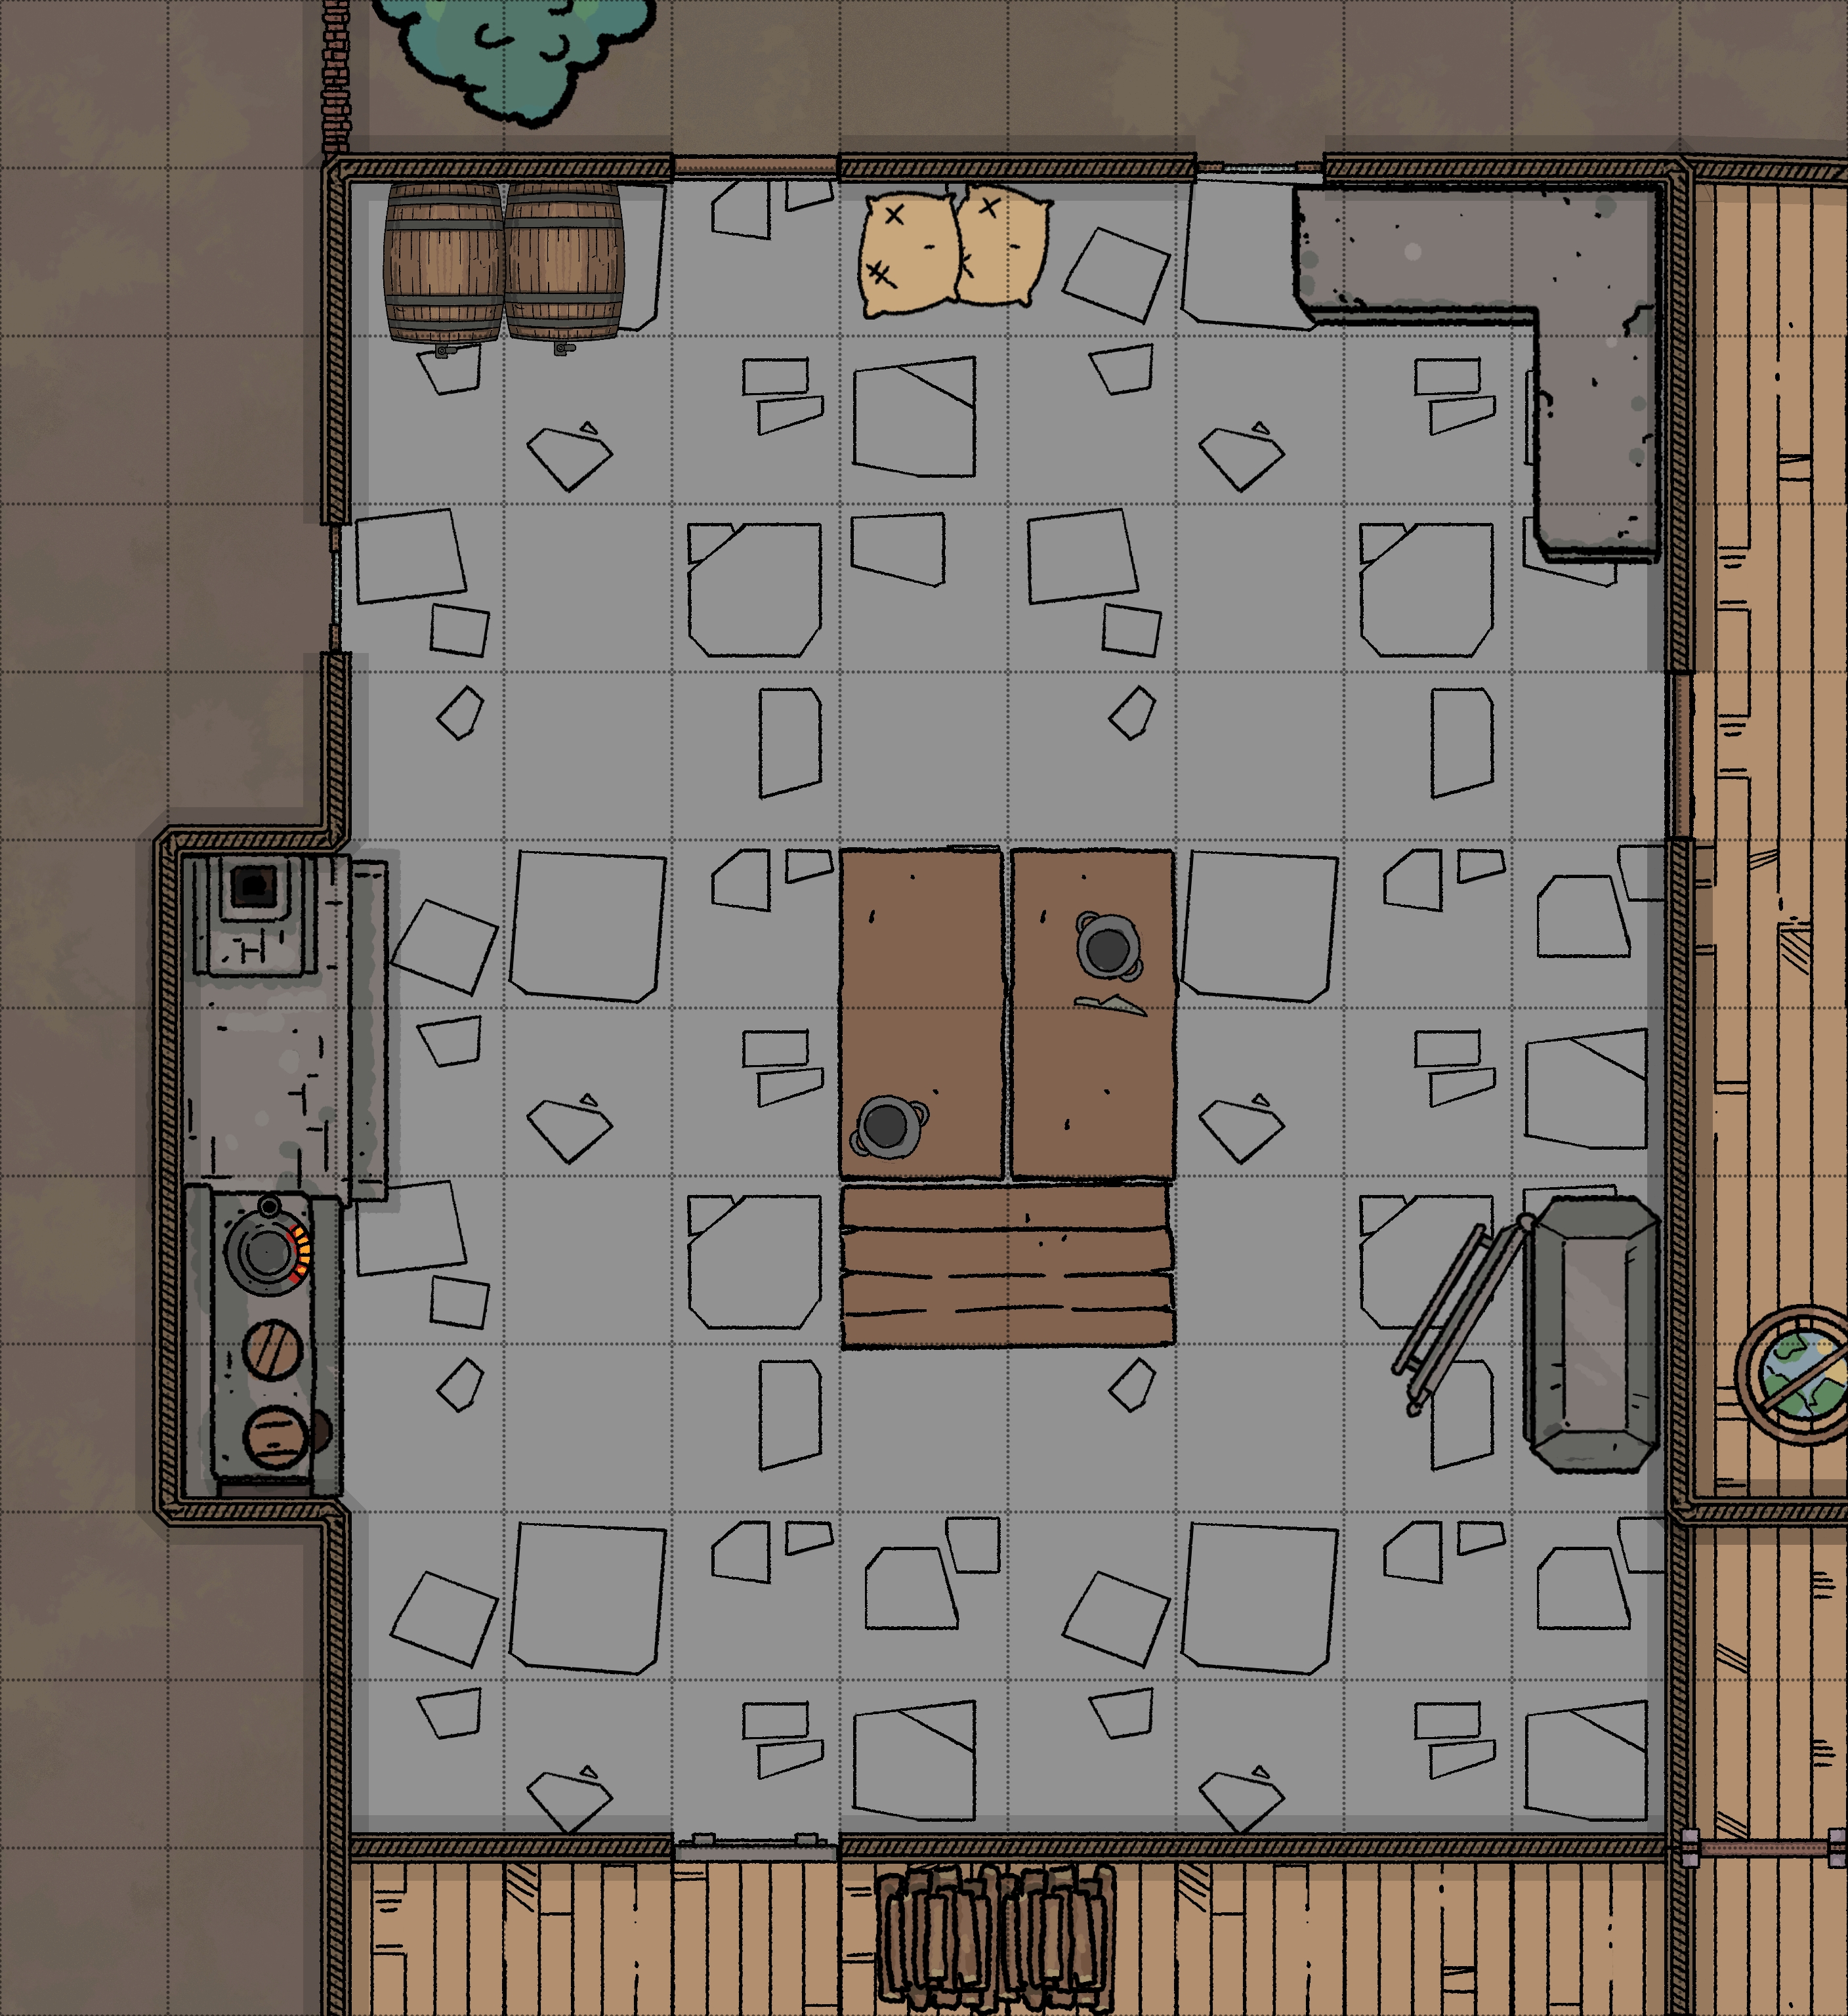
Large kitchen in full working condition, clean surfaces and even wood in the fireplace. It looks like the kitchen is ready to start cooking a meal, but nobody is working, and no food is present. Nothing useful for adventurers can be found unless they are after pots and pans.
There is a sealed, unlabeled clay jar on the counter. If opened, Save Vs Death on a fail, fall to the ground being uncontrollably sick. Roll for an encounter.
Dining Room
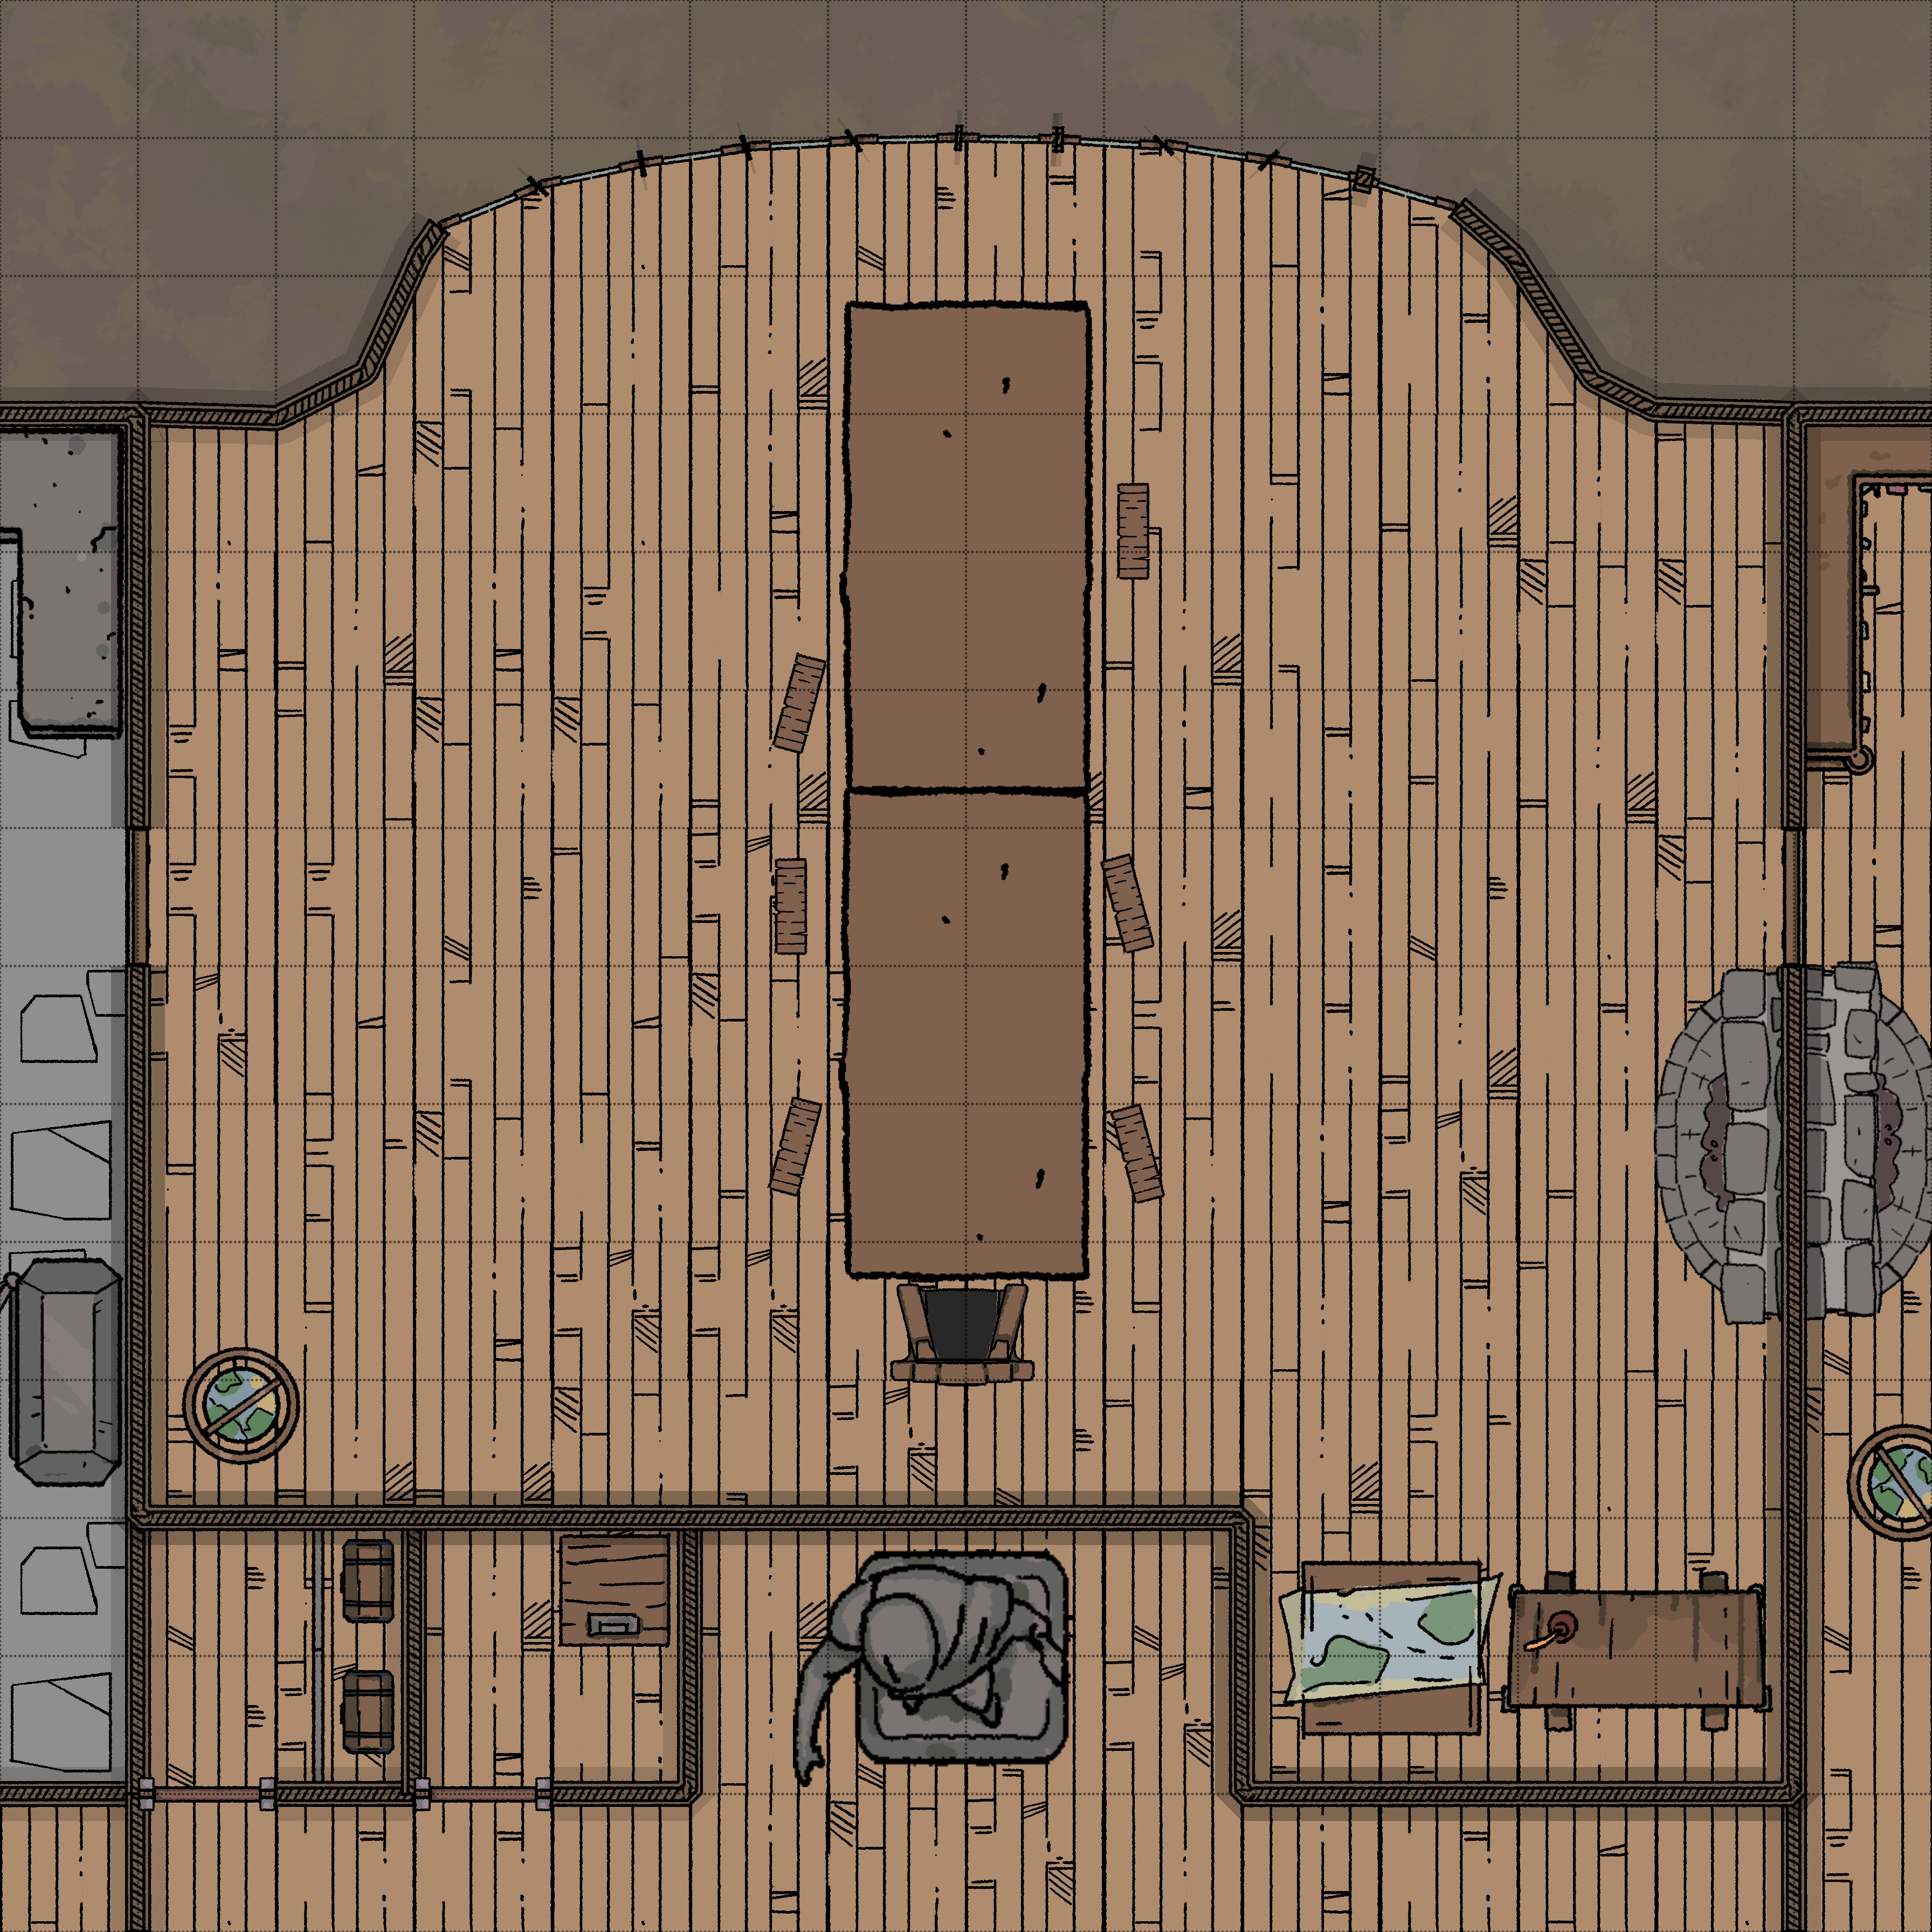
This room is one of the finest in the house; its floors and walls are decorated in rich dark wood. The northern wall is curved and filled with floor-to-ceiling windows, providing a great view of the courtyard and the tower.
A large dining table is positioned so that the head of the table has a view out of the windows. This table is set for a family meal, but the only member present is the Mayor. The Mayor will get very upset about any intrusions and will mistake adventurers for the staff. He will complain that he has been waiting forever for his dinner and will quickly become enraged, culminating in a fight.
- +2 Mace mounted on the wall
- 11,000sp worth of silverware
- 600gp goblets and plates
- Magical large chandler (provides magical candle light)
Sitting Room
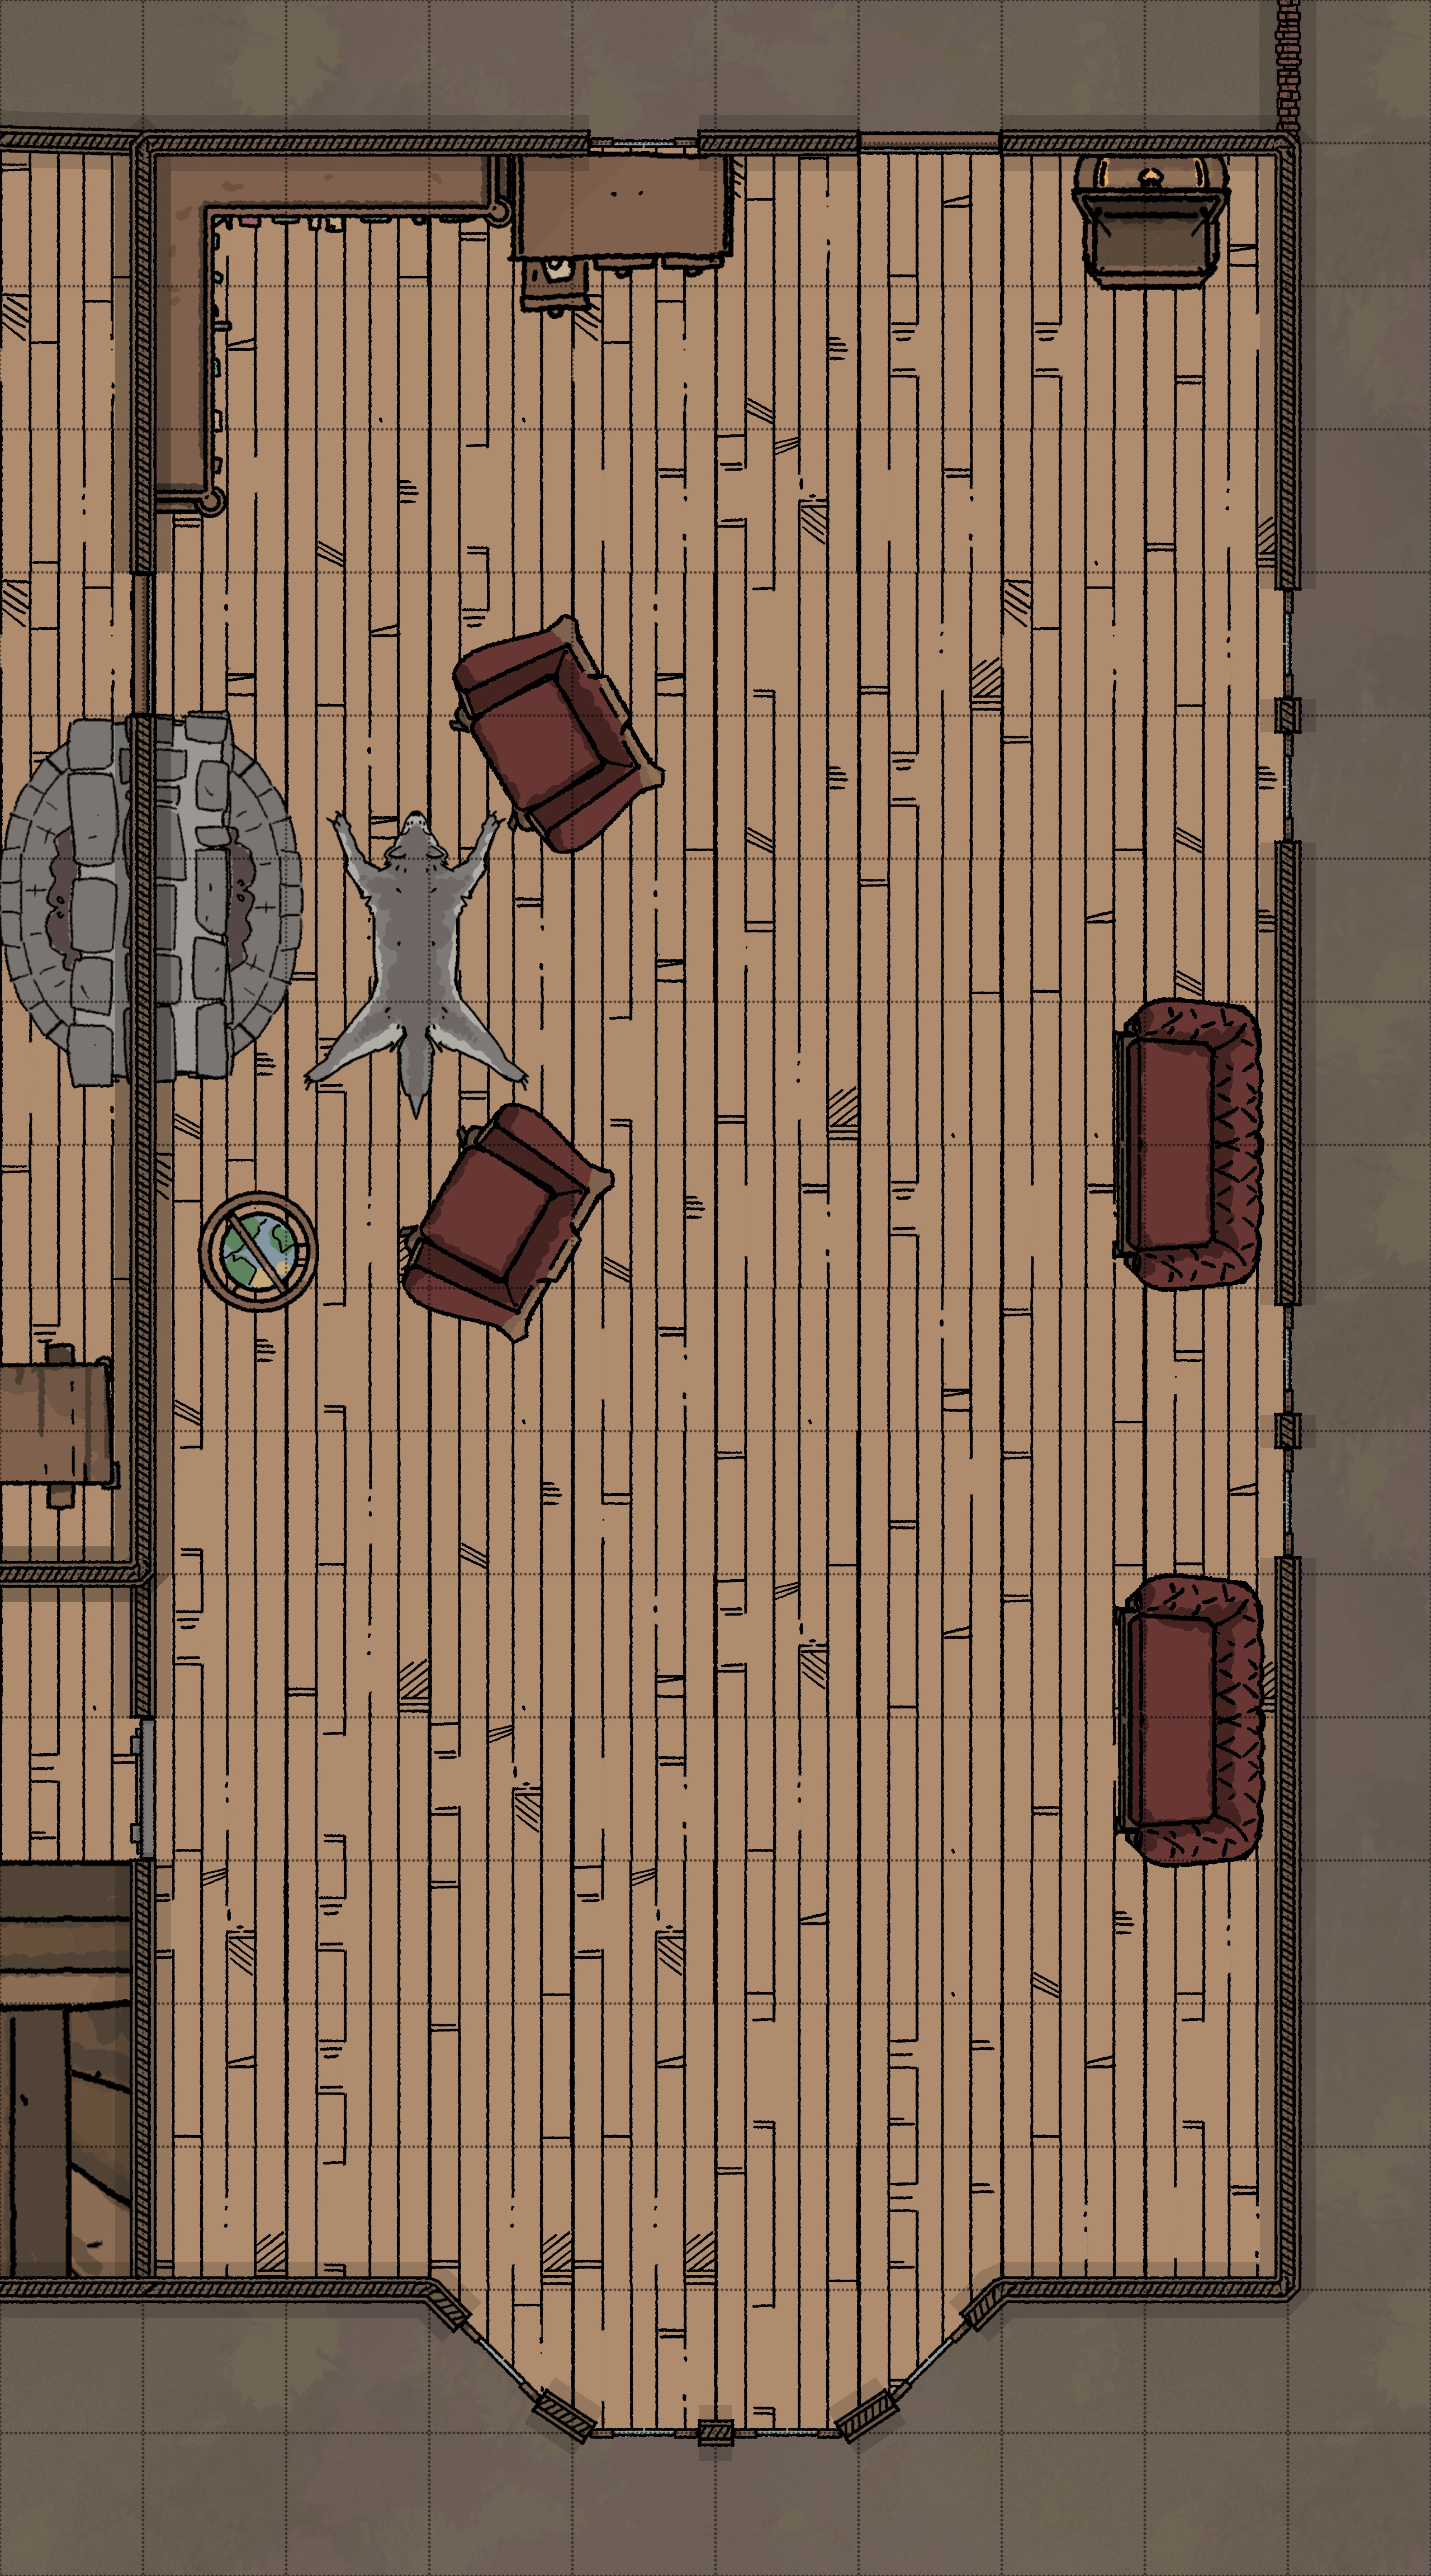
The entire east wing of the home is taken up by an expansive sitting room, containing fireplaces, comfortable chairs and a few bookshelves containing fiction from the time. Scattered around the room is loot!
- 1,000sp
- 200gp
- gem (10gp)
- gem (500gp)
- Locked desk contains a number of spell scrolls: (detect magic (mu), continual light (continual darkness), feeblemind, wizard eye, web)
Courtyard and Kennel
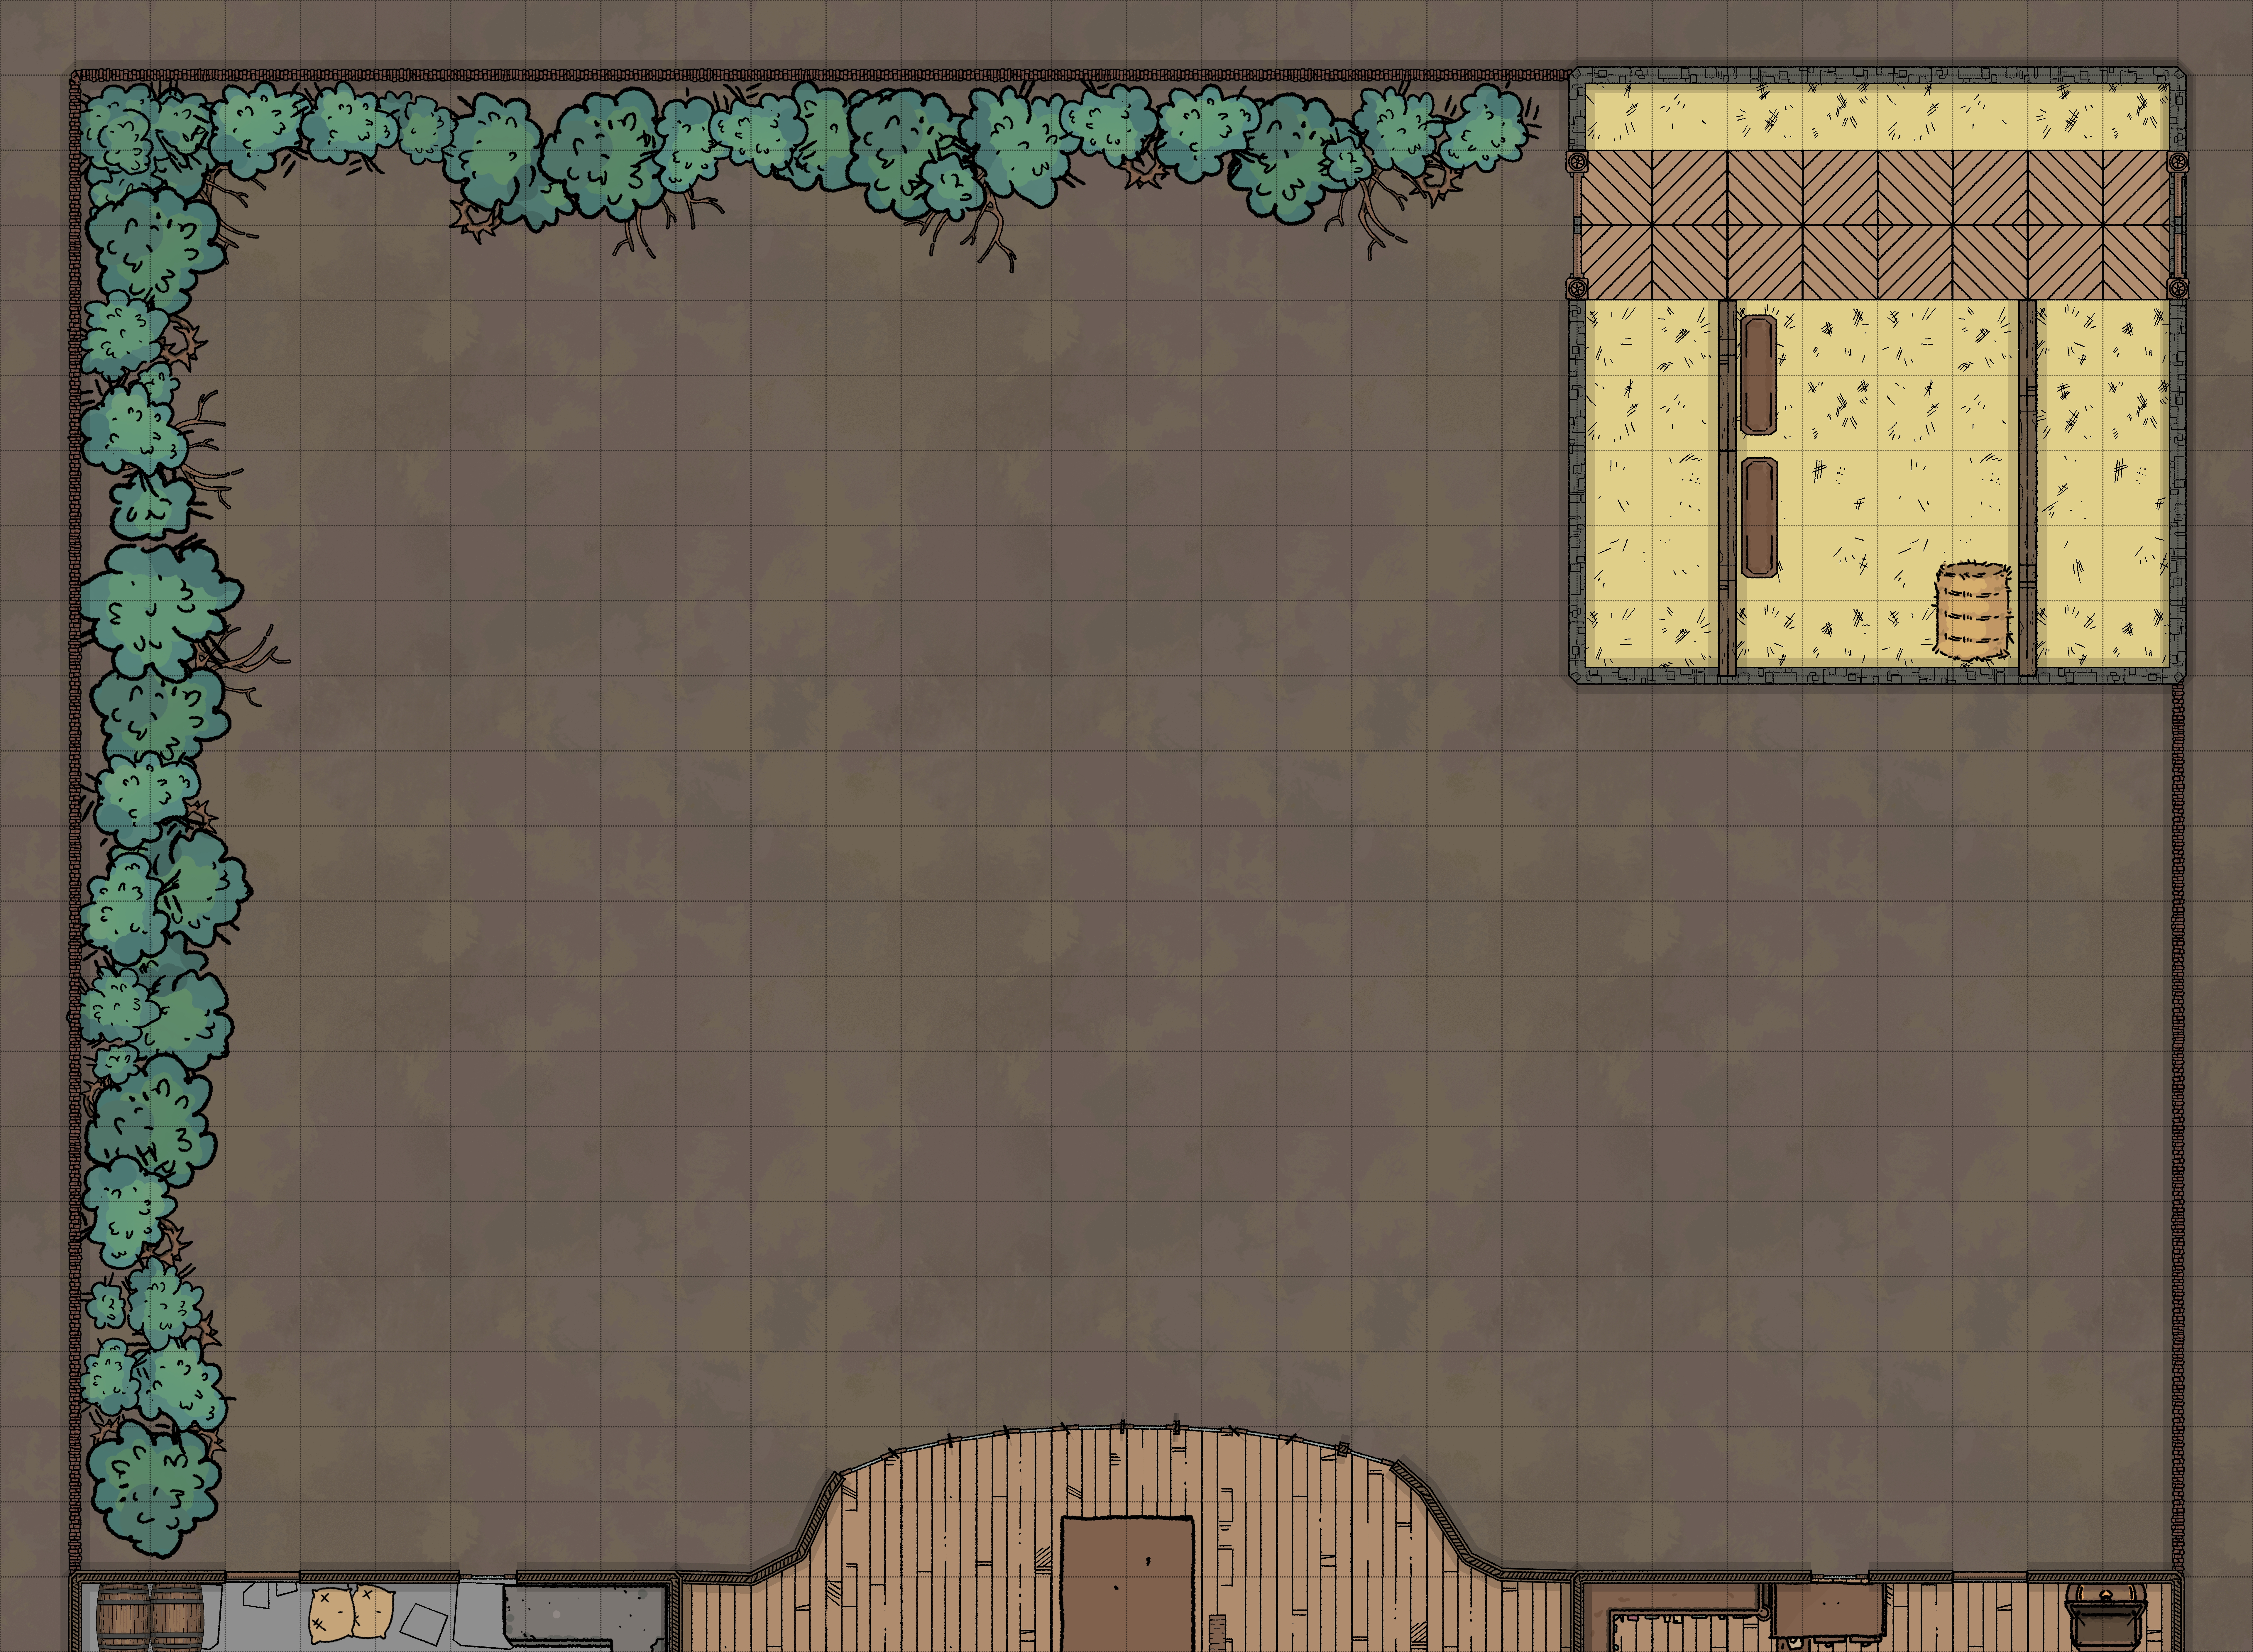
The courtyard of this home is large and overgrown; long grass and overgrown hedgerows are all that can be found here. The hedgerows and walls are covered in thick, thorned vines. Not an issue to those wearing armour.
Small paths can be found thraveling throught he grass leading to the kennel. If an encounter happens here, then it's most likely going to be Blink Dogs that are getting defensive of their home.
At the back of the courtyard are some old kennels, which are currently home to a pack of Blink Dogs. They will be protective of their home but are not overly aggressive.
Nothing of value here apart from dogs.
2nd Floor
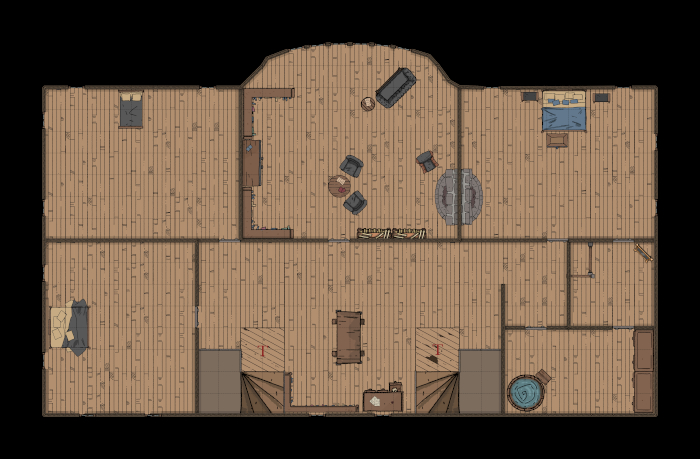
Study
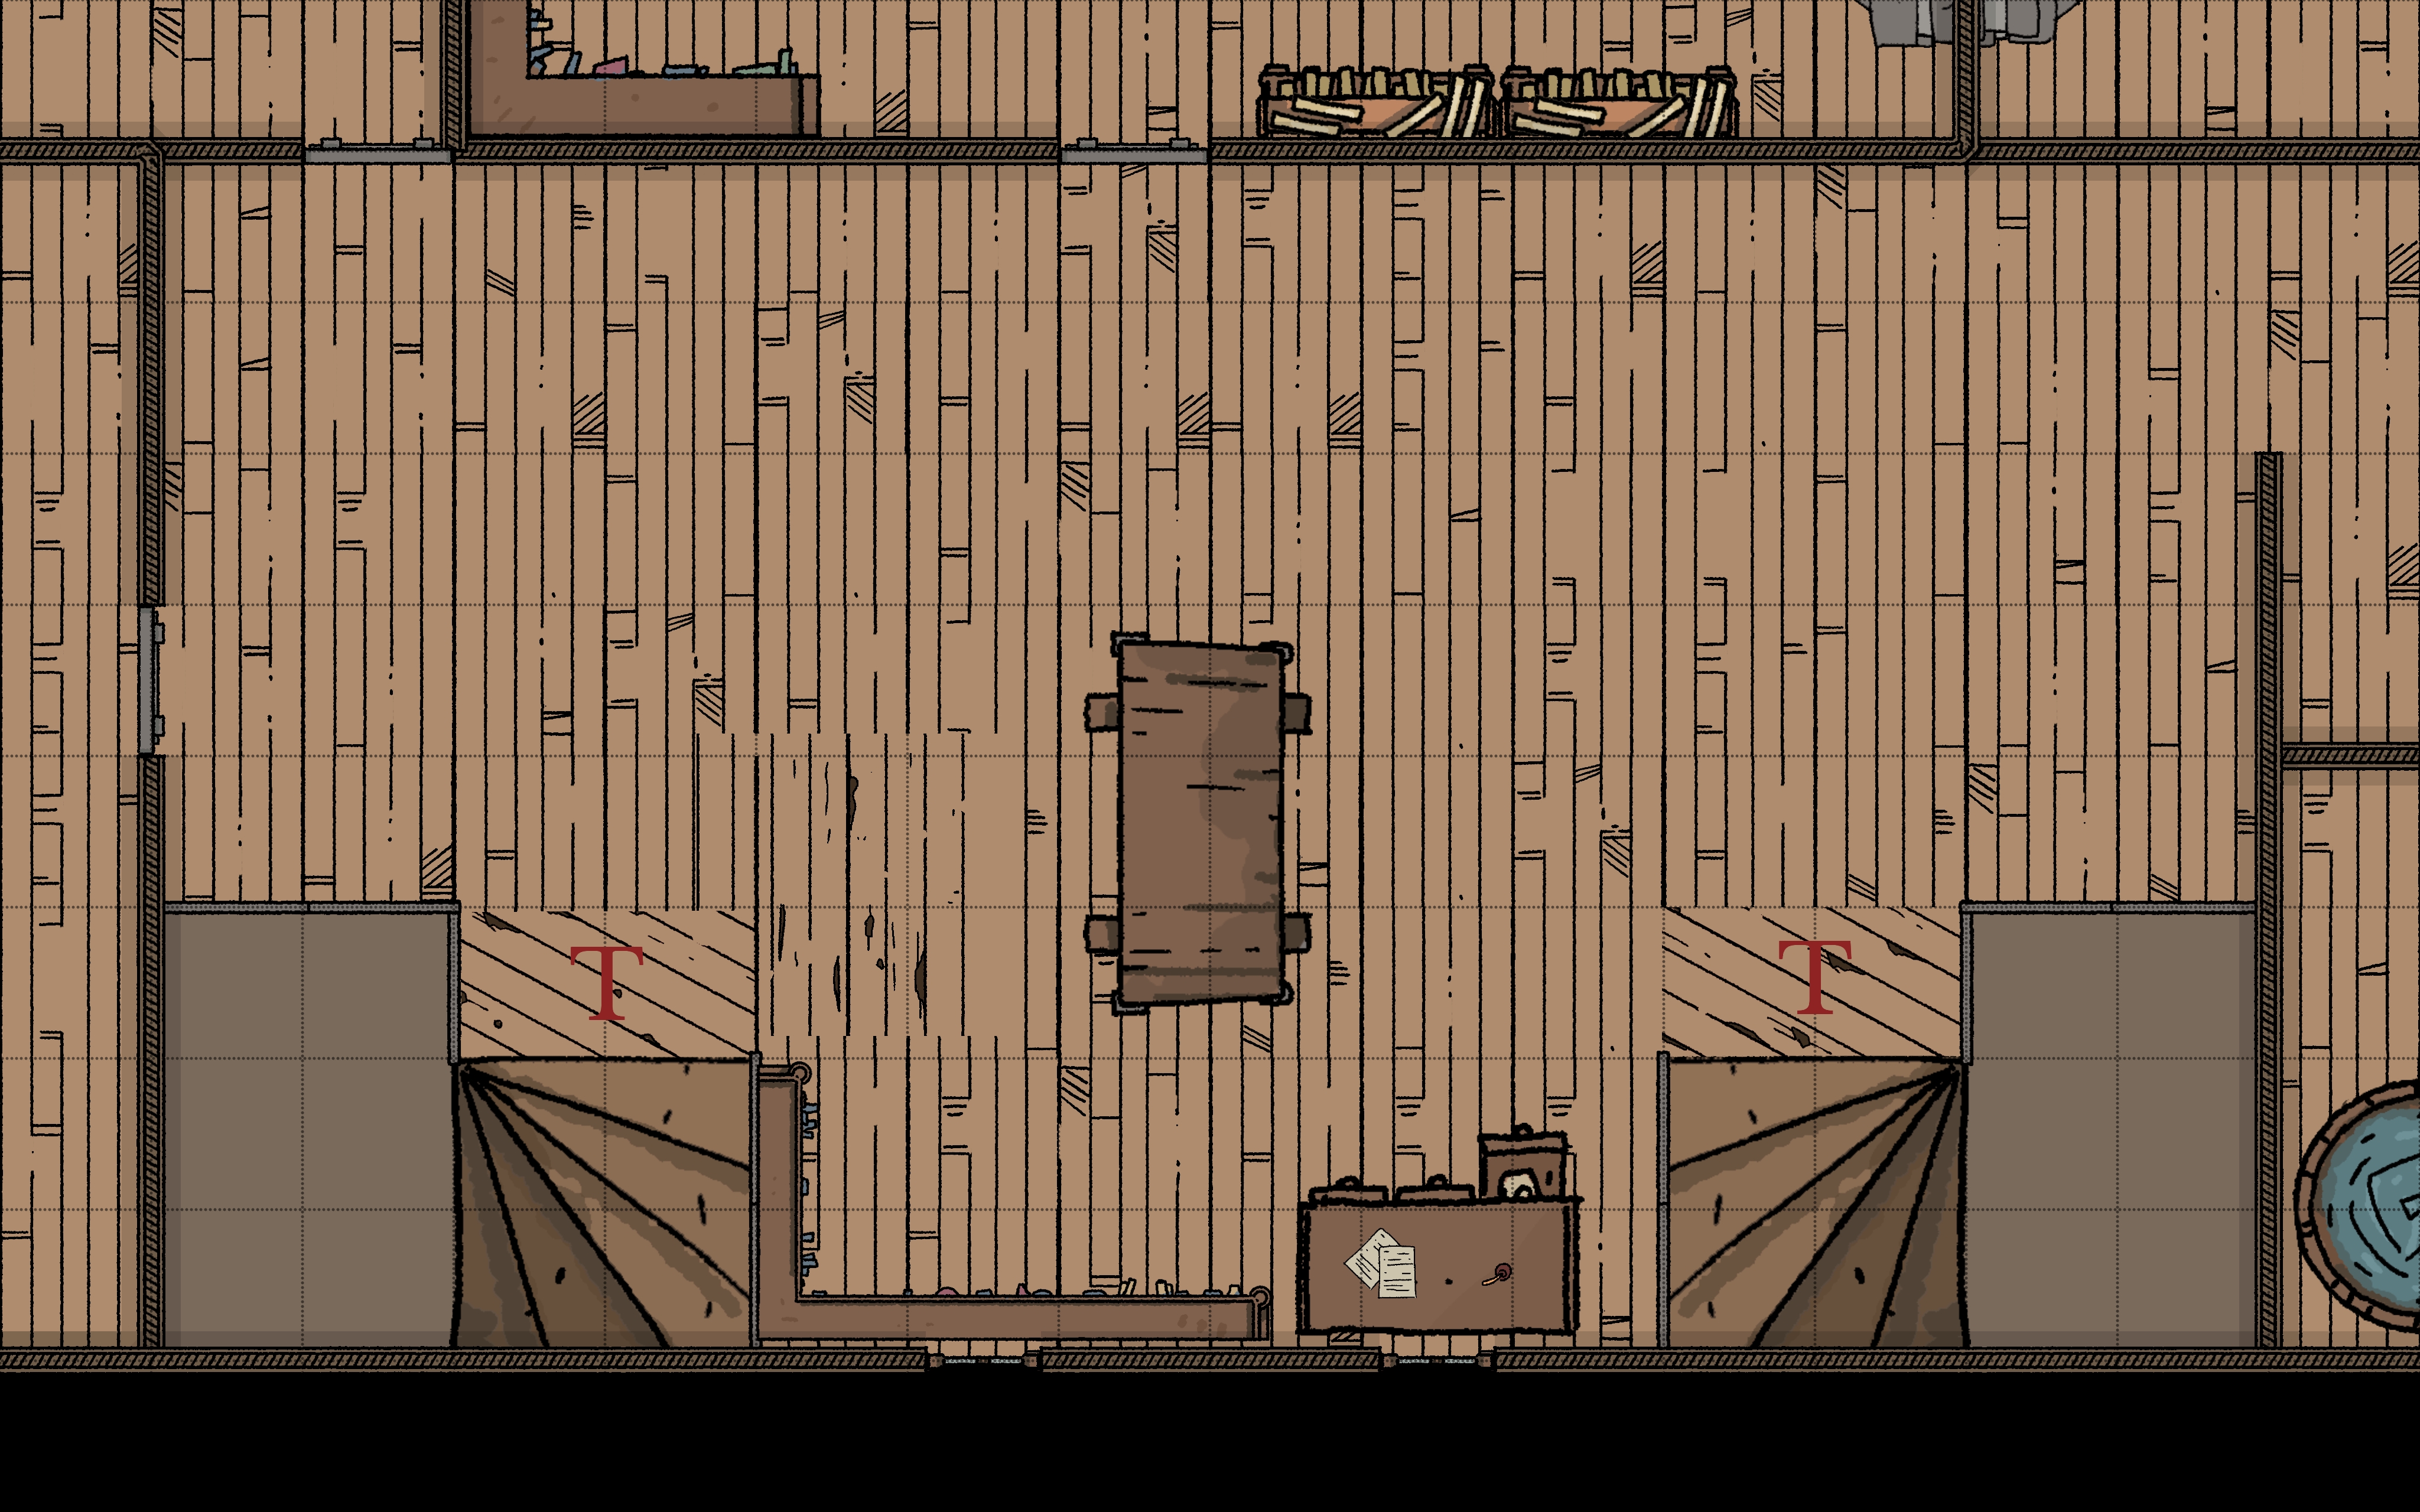
TRAP! At the top of the staircases is a patch of illusory floor. The first 5ft of the landing floor is missing, and an illusion covers this gap. Falling through will land you 10ft below in the lobby.
The rest of the landing has been turned into a simple study with some bookcases and a desk. Most of the books in this bookcase are work-related, discussing the village population and trade.
Worm's Nest
This ominous cave is the worm's lair. The walls are made from stone, and the floor has a thick mud ideal for slithering on. Some of the walls show signs of being expanded through brute force with dragon claws.
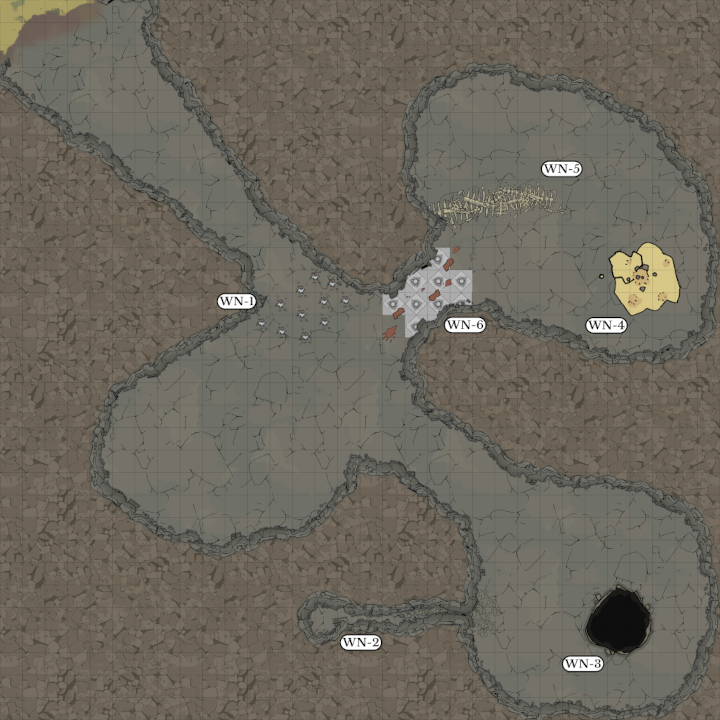
If entering the cave during the day, there is a 5-6 chance the worm will be present, with a 20% chance of being asleep on its horde. The worm has a normal dragon movement speed of 30 feet within the lair, as it can slide more easily in the mud. Adventurers have reduced movement speed due to the mud, 5ft for most, but those in plate feel free to increase this.
WN-1 Entrance
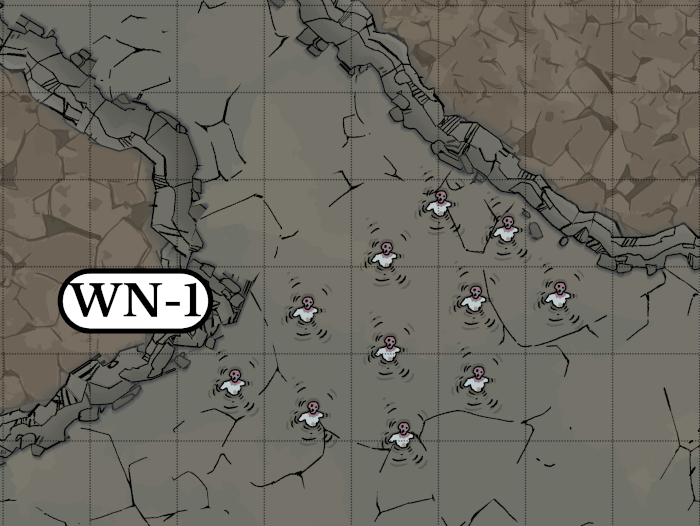
The cave's entrance comes up from the valley by 10feet of mud, easy enough to climb if the weather has been good, a mess if it's been raining or the river has been high recently.
Buried in the mud around the entrance are a number of the dead waiting like landmines for anyone to step near them. When activated, they will grab anyone nearby and start biting. The undead are too buried for them to move or leave the cave. This is the worm's early warning system, and the noise of any fighting should wake them up.
These are all Crawling Zombies taken from the Dead Gate that have been gathered and buried by the worm.
WN-2 Entrance to the Cliff Tower Basement
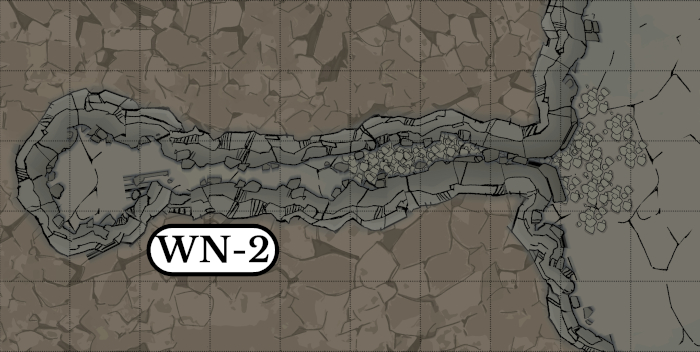
The rope from the cliff tower's basement ends up in a small void before a small tunnel leads off to the east. The ceiling is low, causing most people to hunch over. 20ft into this tunnel, a wall of small rocks blocks any progression. Trapped in this cave in is a body of an adventurer; only their arm can be seen sticking out. Investigating this cave in shows that its made from lots of small rocks that have been fused together with a flash of intense heat.
This is the group of adventurers that attempted to rob the worm again but were discovered. The cave was filled in with rocks before being hit by lightning breath a number of times, fusing the stone.
This cave can be excavated again, but this will create noise.
WN-3 Old Horde
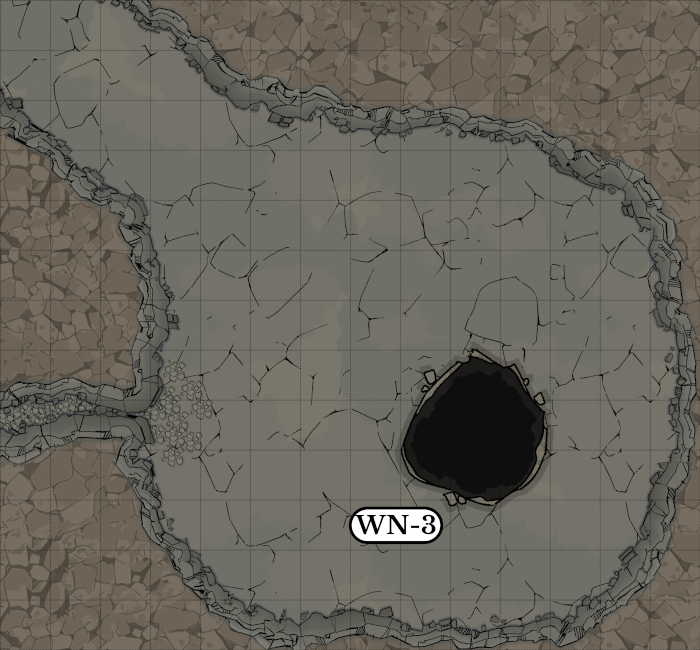
After the Worm's horde was raided by intruders, they moved it to a more secure location within the cave. All that is left now is a shallow pit filled with a scattering of coins. Scratch marks mark the area, but it is clearly now abandoned.
Loot!
- 35gp
- 12ep
- 5sp
WN-4 New Horde
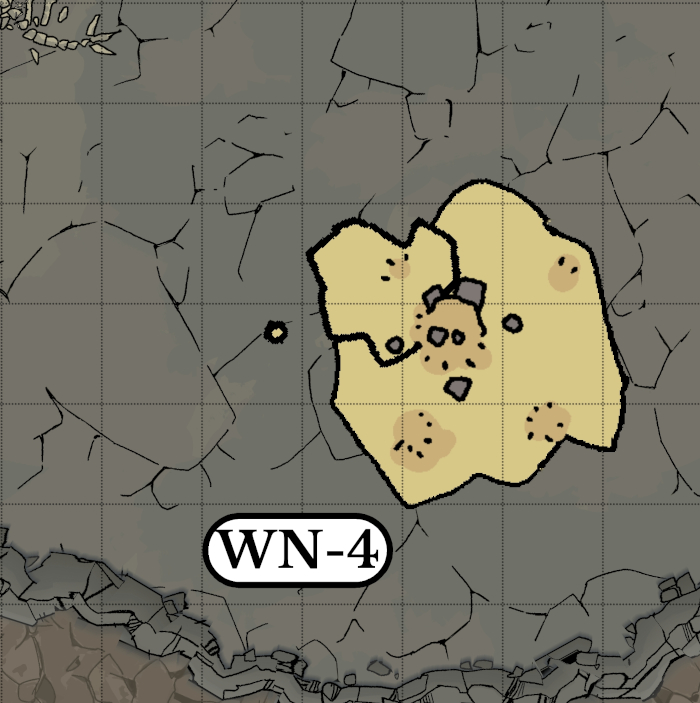
After the Worm's horde was raided by intruders, they moved it to a more secure location within the cave. All that is left now is a shallow pit filled with a scattering of coins. Scratch marks mark the area, but it is clearly now abandoned.
Horde Wealth:
- 20,000ep
- 47,000gp
- 7 × gems (10gp)
- 7 × gems (50gp)
- 7 × gems (100gp)
- 4 × gems (500gp)
- Cloak of the Manta Ray
WN-5 Bone Wall
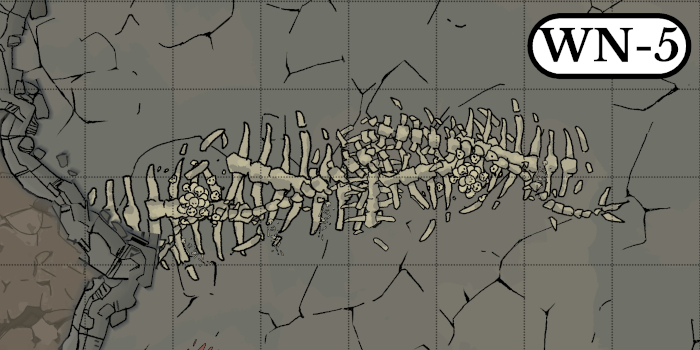
Cutting the room off at an angle is a wall made from bones. This wall shows signs of care when building and has a few small holes that are hard to notice from the outside. This wall is created as defensive cover for the dragon, providing it with spy holes and gaps to fire its breath weapon.
This wall can also be pushed over, trapping anyone caught underneath, only used as a last resort.
WN-6 Metal Trap
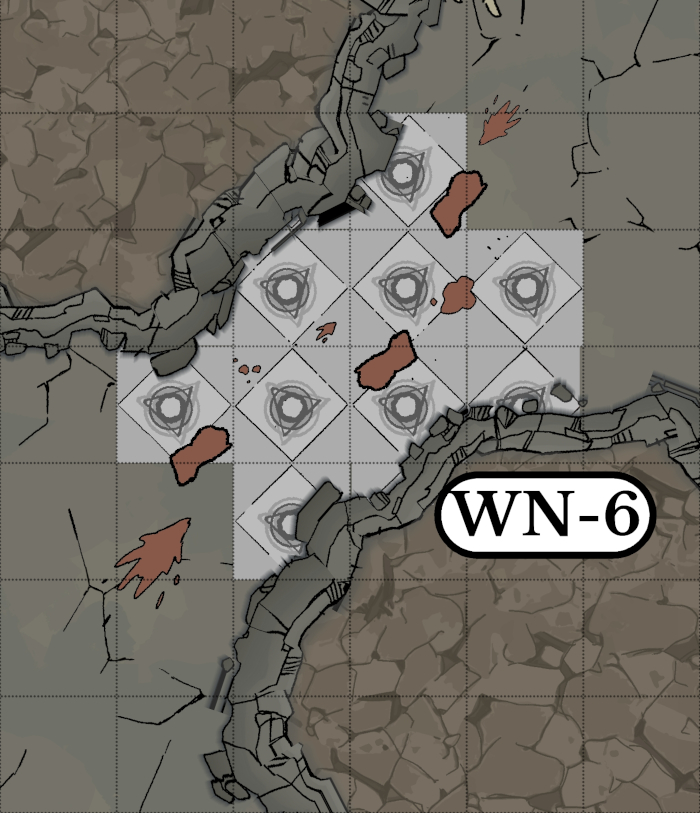
The mud breaks to a rocky patch of floor in a chokepoint in the cave. Mud trails of a large slithering creature can be seen having gone back and forth over this spot.
In the middle of this section is a strangely beautiful decoration of melted weapons, tools and other metal objects in a twisting pattern over the floor. Investigating this artwork closely shows arcane runes designed to help this metal hold a charge.
When this artwork is hit by a dragon's lightning breath, it holds the electric charge for 1d6 turns and does 1d6 damage per round when touched. Save Vs Paralysis to not be stuck to the metal for the round.
Faithful Hound Statue
Danger! - This statue is opposite the entrance to the Mayoral Mannor so the statue in the lobby might start shooting!
This statue is of a large mastiff with a shaggy fur and a big tongue hanging out the side of its open mouth. A small plaque resting against its feet reads: “To my faithful hound Theodopolis, always there to bring me my tools.”
This statue is magical; placing an item in its mouth causes the dog's mouth to close. Calling its name will cause the statue to appear behind you, drop the item, bark loudly, and then disappear. The statue can hold only one item at a time, and only items that fit in its mouth, such as a handle on a sack or a sword.